DBS204: Creating an AlwaysOn cluster in Google Cloud
This is a follow up to the talk that I gave at Next 2019, about how to run highly-available SQL Server in Google Cloud.
As I discussed in that talk, there are a couple of nuances in the architecture due to the way that networking works in Google Cloud Platform. This post details the steps required to create an AlwaysOn cluster in Google Cloud.
1. Network
In Google Cloud, a VPC is a global resource. A single VPC can be used, regardless of the number of regions that you wish to use. Google’s best practice is to split your various applications and environments in to different projects, and therefore I would recommend that you use a shared VPC so that the instances in the different projects are able to communicate with each other.
The VPC can be created using the following command:
gcloud compute networks create dbs204-vpc --subnet-mode=custom
A shared services subnet should be created in each region. Each SQL instance additionally requires its own subnet. For a single region deployment with two SQL instances, the following commands can be used to create the subnets:
gcloud compute networks subnets create dbs204-subnet-eu-west2-shared --network=dbs204-vpc --region=europe-west2 --range=10.10.10.0/24 --enable-private-ip-google-access
gcloud compute networks subnets create dbs204-subnet-eu-west2-sql1 --network=dbs204-vpc --region=europe-west2 --range=10.10.20.0/24 --enable-private-ip-google-access
gcloud compute networks subnets create dbs204-subnet-eu-west2-sql2 --network=dbs204-vpc --region=europe-west2 --range=10.10.30.0/24 --enable-private-ip-google-access
Firewall rules will also be required for the domain controllers, SQL instances and for general RDP access. These can be created using the following commands:
Communication between domain controllers
gcloud compute firewall-rules create dbs204-fw-ad-controller --direction=INGRESS --priority=1000 --network=dbs204-vpc --action=ALLOW --rules=all --source-tags=ad --target-tags=ad
Communication between clients and domain controllers
gcloud compute firewall-rules create dbs204-fw-ad-member --direction=INGRESS --priority=1000 --network=dbs204-vpc --action=ALLOW --rules=tcp:53,tcp:88,tcp:135,tcp:137,tcp:139,tcp:389,tcp:445,tcp:464,tcp:636,tcp:3268,tcp:3269,tcp:49152-65535,udp:53,udp:88,udp:123,udp:135,udp:137,udp:138,udp:389,udp:445,udp:464,udp:49152-65535 --source-ranges=10.10.10.0/24,10.10.20.0/24,10.10.30.0/24 --target-tags=ad
Communication between SQL instances
gcloud compute firewall-rules create dbs204-fw-sql --direction=INGRESS --priority=1000 --network=dbs204-vpc --action=ALLOW --rules=all --source-tags=sql --target-tags=sql
Commuication between SQL instances and file share witness
gcloud compute firewall-rules create dbs204-fw-fs --direction=INGRESS --priority=1000 --network=dbs204-vpc --action=ALLOW --rules=tcp:445 --source-tags=sql --target-tags=fsw
Communication between clients and SQL instances
gcloud compute firewall-rules create dbs204-fw-sql-client --direction=INGRESS --priority=1000 --network=dbs204-vpc --action=ALLOW --rules=tcp:1433 --source-tags=app --target-tags=sql
2. Instances
The following instances need to be created:
- Two domain controllers in the shared services subnet
- One file share witness in the shared services subnet
- Two SQL instances, one in each of the SQL1 and SQL2 subnets
The two domain controllers will be deployed in to different zones, and the two SQL instances will be deployed in to the same zones. The file share witness will be deployed in to a completely different zone. The SQL instances will additionally have alias IP ranges configured to allow cluster resources to be failed over to them.
The following commands can be used to do this:
Domain controllers
gcloud compute instances create dbs204-vm-ad1 --zone=europe-west2-a --machine-type=n1-standard-1 --subnet=dbs204-subnet-eu-west2-shared --private-network-ip=10.10.10.2 --scopes=default --tags=ad --image-project=windows-cloud --image-family=windows-2019-core
gcloud compute instances create dbs204-vm-ad2 --zone=europe-west2-c --machine-type=n1-standard-1 --subnet=dbs204-subnet-eu-west2-shared --private-network-ip=10.10.10.3 --scopes=default --tags=ad,rdp --image-project=windows-cloud --image-family=windows-2019-core
File share witness
gcloud compute instances create dbs204-vm-fsw1 --zone=europe-west2-b --machine-type=n1-standard-1 --subnet=dbs204-subnet-eu-west2-shared --private-network-ip=10.10.10.3 --scopes=default --tags=fsw,rdp --image-project=windows-cloud --image-family=windows-2019-core
SQL instances
gcloud compute instances create dbs204-vm-sql1 --zone=europe-west1-a --machine-type=n1-standard-1 --subnet=dbs204-subnet-eu-west2-sql1 --private-network-ip=10.10.20.2 --aliases=10.10.20.8/29 --scopes=default --tags=sql,rdp --image-project=windows-sql-cloud --image-family=sql-ent-2017-win-2019
gcloud compute instances create dbs204-vm-sql2 --zone=europe-west1-c --machine-type=n1-standard-1 --subnet=dbs204-subnet-eu-west2-sql2 --private-network-ip=10.10.30.2 --aliases=10.10.30.8/29 --scopes=default --tags=sql,rdp --image-project=windows-sql-cloud --image-family=sql-ent-2017-win-2019
3. DNS
The instances will run in a domain, and therefore will need to resolve the DNS zones on the domain controllers. This can be done by manually changing the DNS client configuration on the member servers to point to the domain controllers, but the private zones option in Cloud DNS can also be used. A private DNS zone can be added to forward requests to the domain controllers.
The following command will create a private DNS zone for the domain:
gcloud beta dns managed-zones create dbs204-ad-zone --dns-name="ad.local" --description="Zone for DBS204 AD" --networks="dbs204-vpc" --visibility=private --forwarding-targets="10.10.10.2,10.10.10.3"
4. Domain controllers
A new domain can be created, or an existing domain can be extended in to Google Cloud if there is an existing Cloud VPN or Direct Interconnect link back to on-premises.
The following PowerShell can be run on the first domain controller to create a new domain in a new forest:
Install-WindowsFeature -Name "AD-Domain-Services" -IncludeManagementTools
Install-ADDSForest -DomainName "ad.local" -DomainNetbiosName "AD" -DomainMode WinThreshold -ForestMode WinThreshold -InstallDns -SafeModeAdministratorPassword (Read-Host -Prompt "Enter a password" -AsSecureString)
The following PowerShell can be run on subsequent domain controllers to join them to the existing domain:
Install-WindowsFeature -Name "AD-Domain-Services" -IncludeManagementTools
Install-ADDSDomainController -DomainName "ad.local" -InstallDns -SafeModeAdministratorPassword (Read-Host -Prompt "Enter a password" -AsSecureString)
While joining additional domain controllers to the existing domain, you need to consider DNS resolution for the domain. If the forwarding targets have been set to all possible domain controllers when creating the private DNS zone, the DNS request may timeout as it may attempt to use a domain controller that has not been promoted yet for DNS resolution.
To workaround this, either set the forwarding target initially to only the first domain controller in the domain, or set the DNS client locally on the instance to point to the first domain controller. The following PowerShell can be run on the instance to do the latter:
Set-DnsClientServerAddress -InterfaceAlias @("Ethernet") -ServerAddresses @("10.10.10.2")
The following PowerShell can also be run on one of the domain controllers to create a new AD group that will be used to grant access to various resources for all instances in the cluster:
$Group = New-ADGroup -Name "DBS204 Cluster Group" -GroupCategory Security -GroupScope DomainLocal
$Group | Add-ADGroupMember -Members @("dbs204-vm-sql1","dbs204-vm-sql2")
5. File share witness
The file share witness needs to have the file services role installed, and a file share created that the cluster has access to. The following PowerShell can be used to do this:
Install-WindowsFeature -Name "File-Services" -IncludeManagementTools
New-Item -Path "C:\Shares\FSW" -ItemType Directory -
New-SmbShare -Name "FSW" -Path "C:\Shares\FSW" -FolderEnumerationMode AccessBased
Grant-SmbShareAccess -Name "FSW" -AccountName "AD\DBS204 Cluster Group" -AccessRight Full -Force
6. SQL instances
The SQL instances will need to first be joined to the same Windows cluster. The following PowerShell can be run on a single instance to create the cluster and join all instances to it:
$Instances = @("dbs204-vm-sql1","dbs204-vm-sql2")
Invoke-Command -ComputerName $Instances -ScriptBlock { Install-WindowsFeature Failover-Clustering -IncludeManagementTools }
Test-Cluster -Node $Instances # Review the results before creating the cluster to ensure that the instances are suitable for clustering
New-Cluster -Name "cluster" -Node $Instances -StaticAddress @("10.10.20.9","10.10.30.9") -NoStorage
The following PowerShell should be run on a domain controller to add the cluster AD object to the cluster AD group:
Get-ADGroup -Name "DBS204 Cluster Group" | Add-ADGroupMember -Members @("cluster")
The file share witness can then be set as the cluster quorum resource by running the following PowerShell on one of the SQL instances:
Move-ClusterGroup -Name "Cluster Group" # This will refresh the group membership of the cluster AD object
Set-ClusterQuorum -NodeAndFileShareMajority "\\dbs204-vm-fsw1.ad.local\FSW"
Once the instances have been joined to the cluster, the following PowerShell can be run on each instance to set the instance name correctly, enable AlwaysOn and allow the instances to access each other:
# Import SQL Server PowerShell module
Import-Module -Name "SQLPS"
$Instance = Get-Item -Path "SQLSERVER:\Sql\localhost\DEFAULT"

# Set instance name
$ComputerName = hostname
$CurrentSqlServerName = (Invoke-SqlCmd -Query "SELECT @@SERVERNAME AS ServerName;" -ServerInstance $Instance).ServerName
Invoke-SqlCmd -Query "sp_dropserver '$CurrentSqlServerName';" -ServerInstance $Instance
Invoke-SqlCmd -Query "sp_addserver '$ComputerName', local;" -ServerInstance $Instance

# Enable AlwaysOn
Enable-SqlAlwaysOn -Path "SQLSERVER:\Sql\localhost\DEFAULT" -Force

# Create logins
foreach ($Server in @("dbs204-vm-sql1", "dbs204-vm-sql2")) {
    Invoke-SqlCmd -Query "USE master; CREATE LOGIN [AD\$Server$] FROM WINDOWS; GRANT CONNECT ON ENDPOINT::[Hadr_endpoint] TO [AD\$Server$]; GRANT CREATE ANY DATABASE TO [AD\$Server$]; GO" -ServerInstance $Instance
}
7. Availability Group
New Avaialability Groups can be created either using T-SQL or through the SQL Server Management Studio GUI. The databases need to be created on the first instance, and a full backup taken of those instances, prior to creating the Availability Group. The following T-SQL can be used to create an Availability Group:
CREATE AVAILABILITY GROUP ag1
    WITH (
        AUTOMATED_BACKUP_PREFERENCE = SECONDARY,
        FAILURE_CONDITION_LEVEL  =  3,
        HEALTH_CHECK_TIMEOUT = 600000
    )
    FOR
        DATABASE db1, db2
    REPLICA ON
        'dbs204-vm-sql1' WITH (
            ENDPOINT_URL = 'tcp://dbs204-vm-sql1.ad.local:5022',
            AVAILABILITY_MODE = SYNCHRONOUS_COMMIT,
            FAILOVER_MODE = AUTOMATIC,
            SEEDING_MODE = AUTOMATIC,
            BACKUP_PRIORITY = 30,
            SECONDARY_ROLE (
                ALLOW_CONNECTIONS = YES,
                READ_ONLY_ROUTING_URL = 'tcp://dbs204-vm-sql1.ad.local:5022'
            ),
            PRIMARY_ROLE (
                ALLOW_CONNECTIONS = READ_WRITE,
                READ_ONLY_ROUTING_LIST = (
                    dbs204-vm-sql2,
                    dbs204-vm-sql1
                )
            ),
            SESSION_TIMEOUT = 10
        ),
        'dbs204-vm-sql2' WITH (
            ENDPOINT_URL = 'tcp://dbs204-vm-sql2.ad.local:5022',
            AVAILABILITY_MODE = SYNCHRONOUS_COMMIT,
            FAILOVER_MODE = AUTOMATIC,
            SEEDING_MODE = AUTOMATIC,
            BACKUP_PRIORITY = 30,
            SECONDARY_ROLE (
                ALLOW_CONNECTIONS = YES,
                READ_ONLY_ROUTING_URL = 'tcp://dbs204-vm-sql2.ad.local:5022'
            ),
            PRIMARY_ROLE (
                ALLOW_CONNECTIONS = READ_WRITE,
                READ_ONLY_ROUTING_LIST = (
                    dbs204-vm-sql1,
                    dbs204-vm-sql2
                )
            ),
            SESSION_TIMEOUT = 10
        );
GO

ALTER AVAILABILITY GROUP [ag1]
    ADD LISTENER 'listen1' (
        WITH IP (
            ('10.10.20.10'),
            ('10.10.30.10')
        ),
        PORT = 1433
    );
GO
An Availability Group can be set up through the GUI using the following steps:
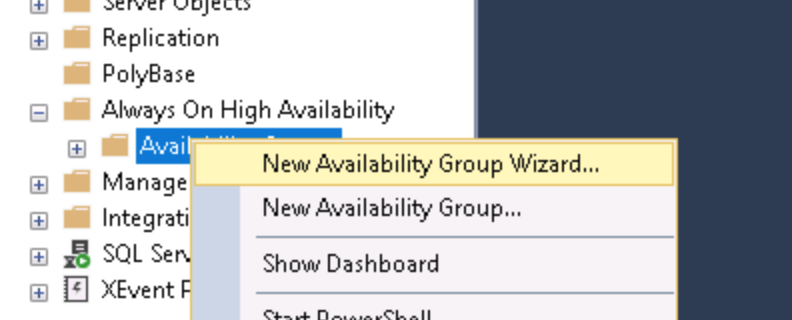
- Expand Always On High Availability, right-click on Availability Groups and click on New Availability Group Wizard.
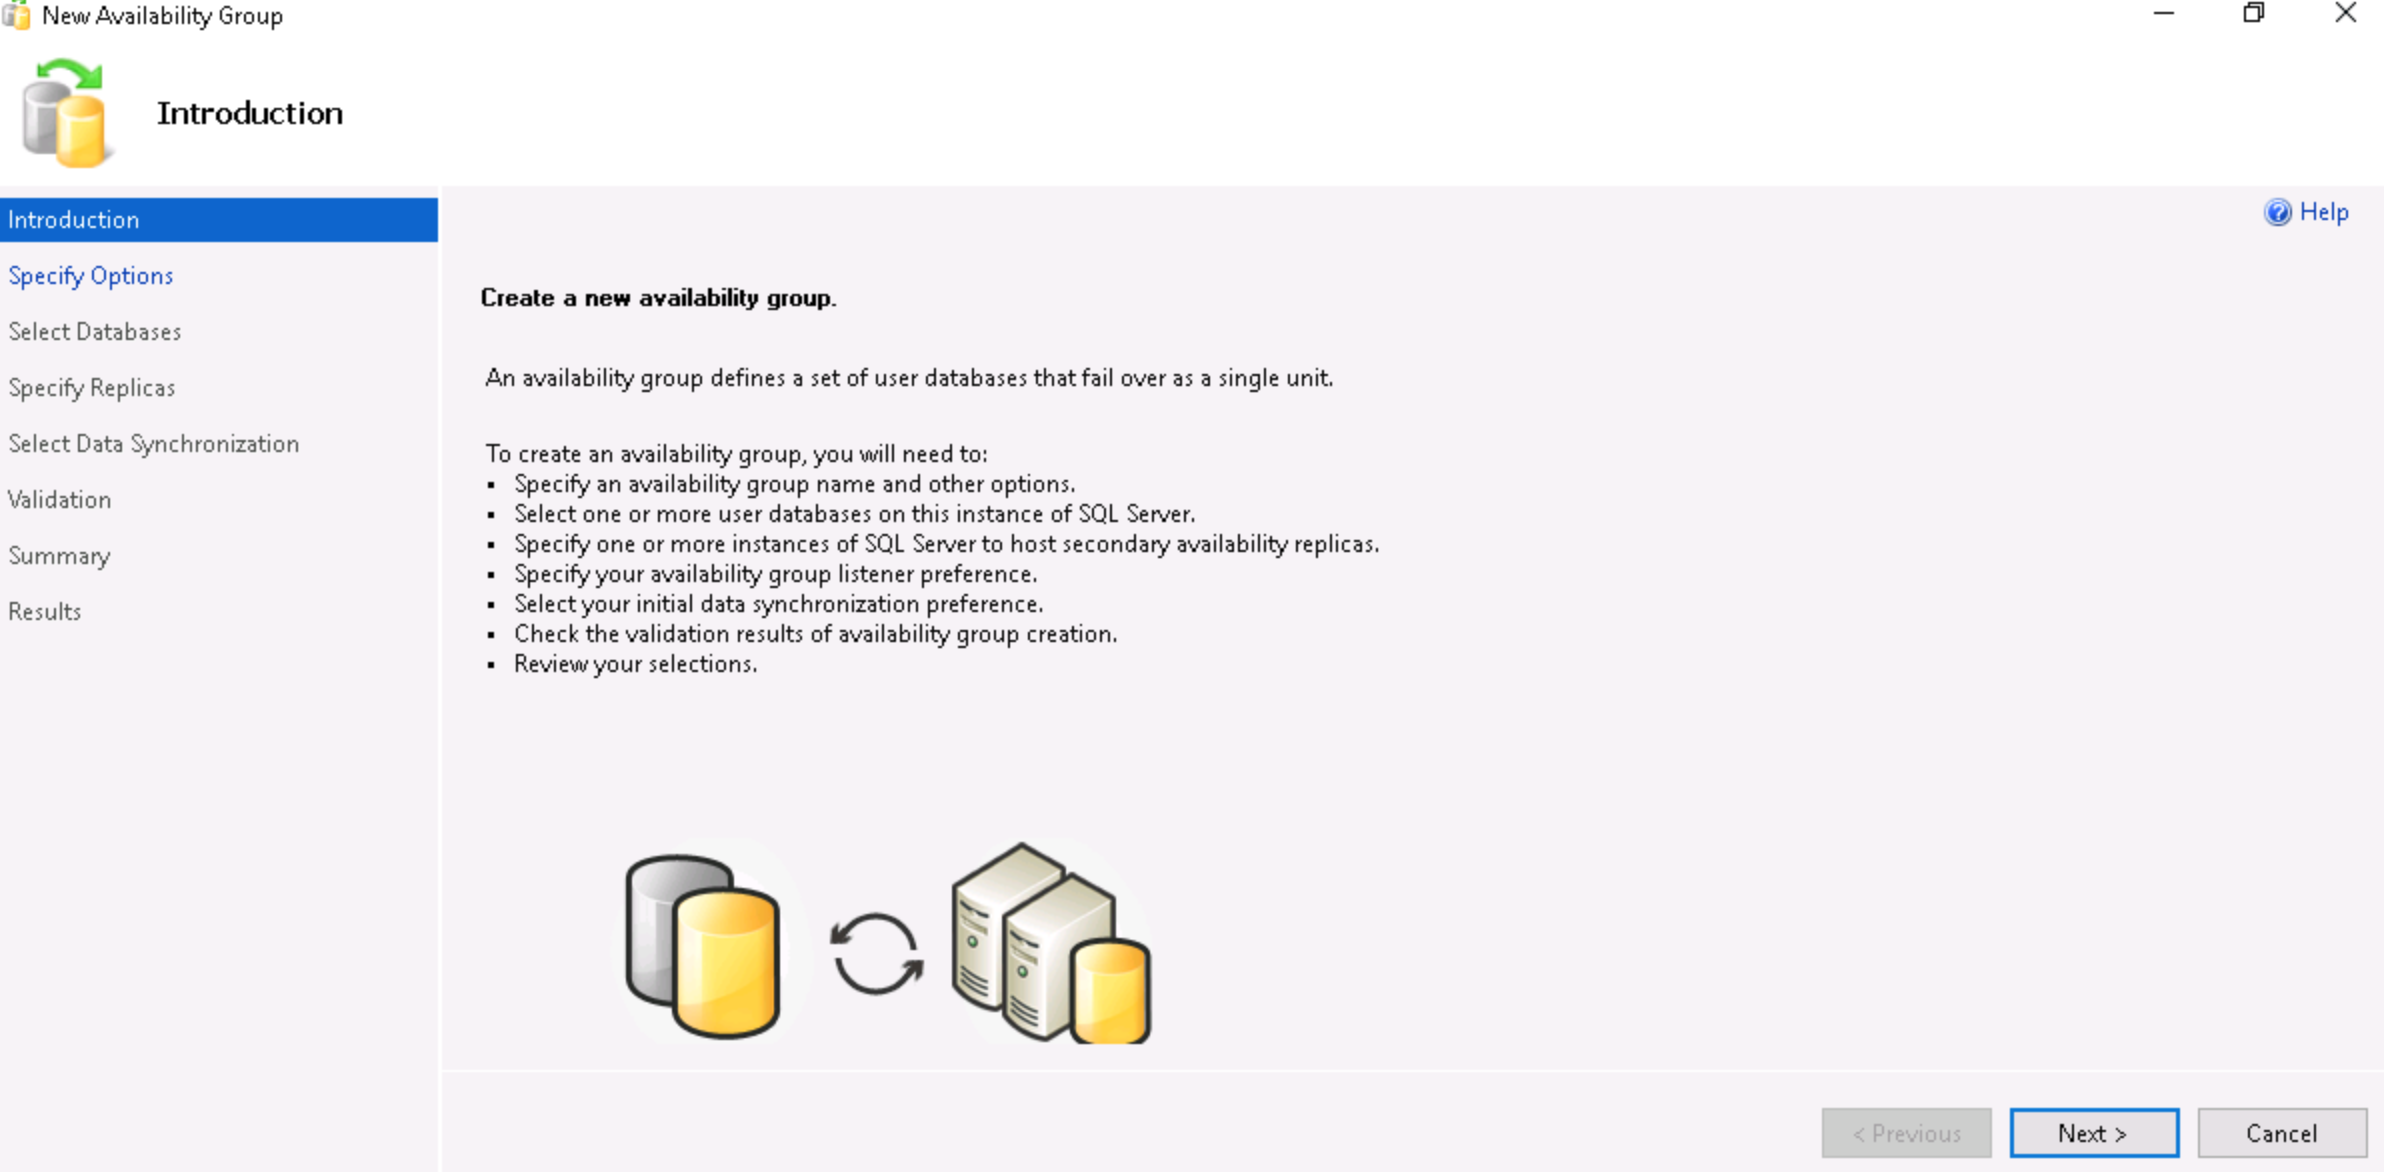
- Click on Next.
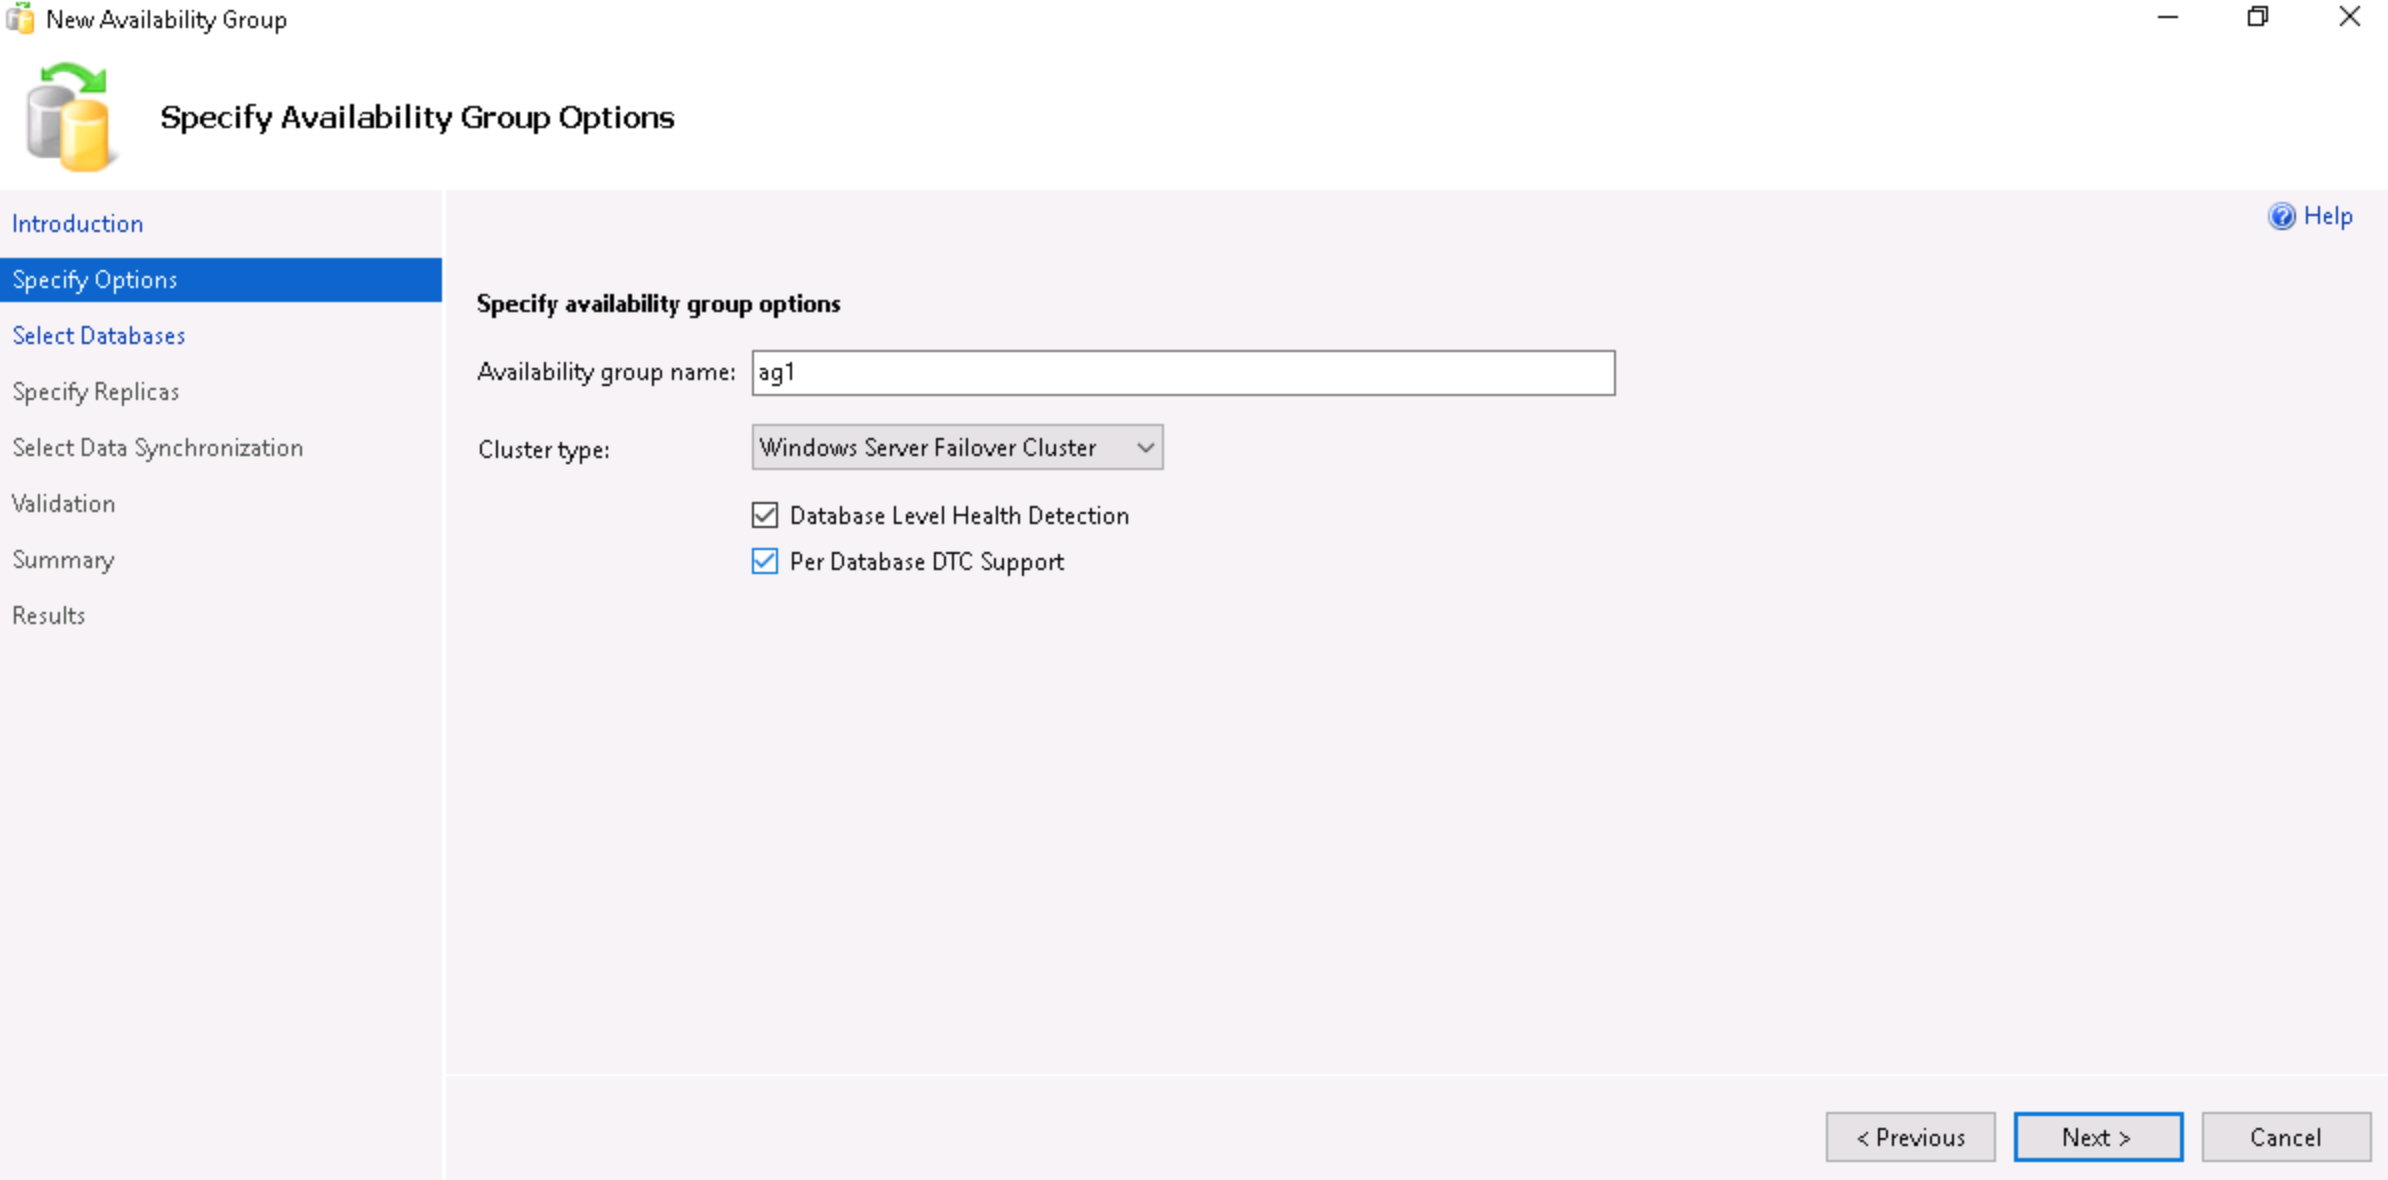
- Enter a name for the Availability Group. Ensure that the Cluster type is set to Windows Server Failover Cluster, check both boxes and click on Next.
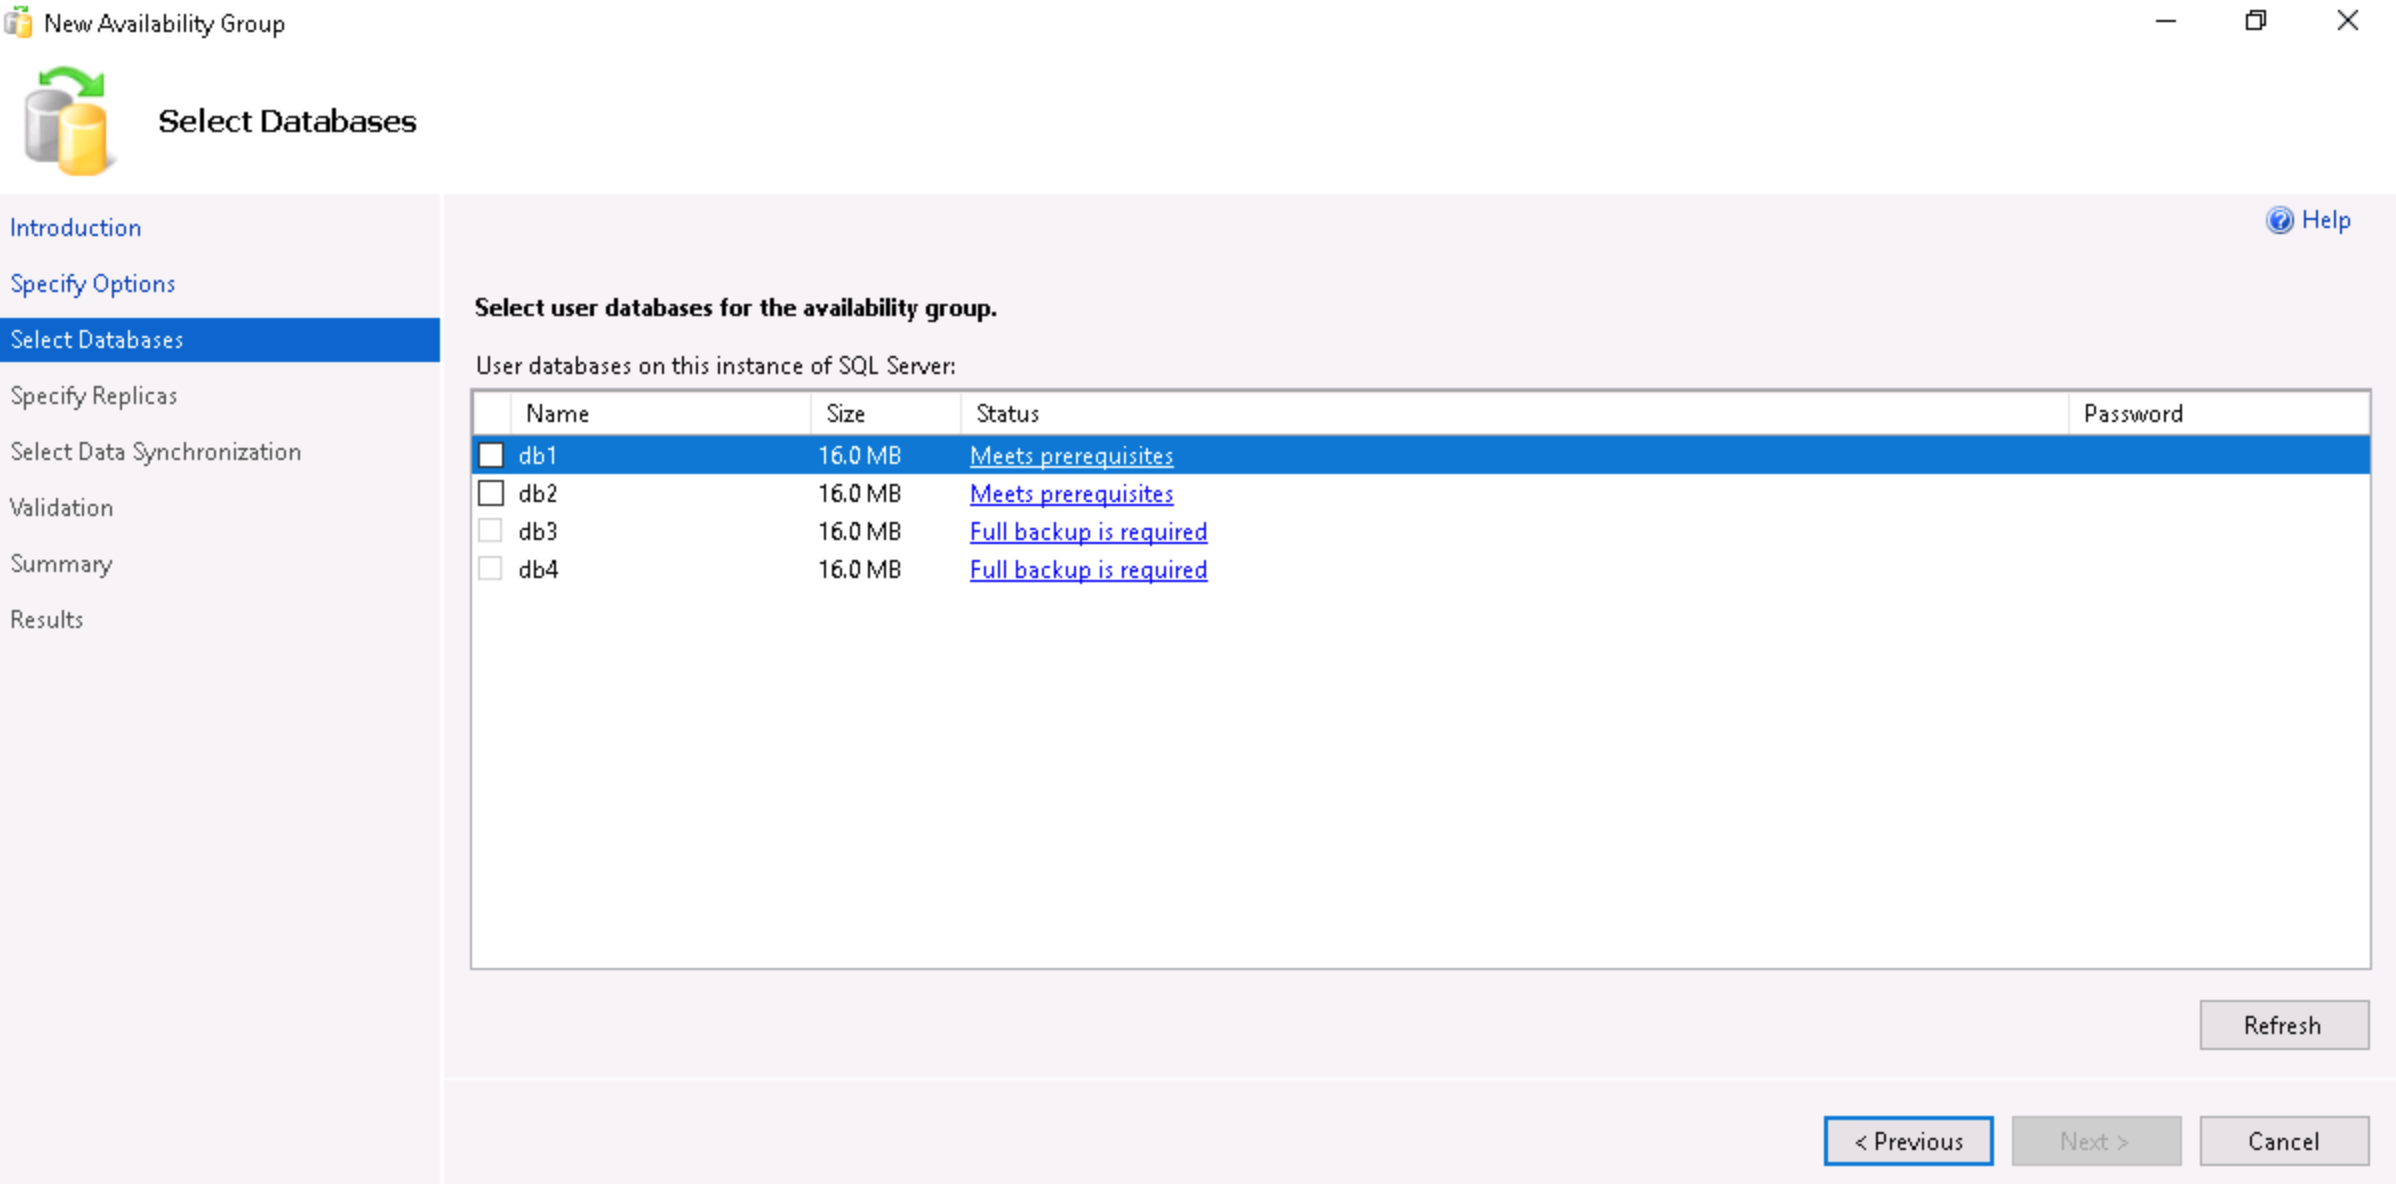
- Select the databases to add to the Availability Group and click on Next.
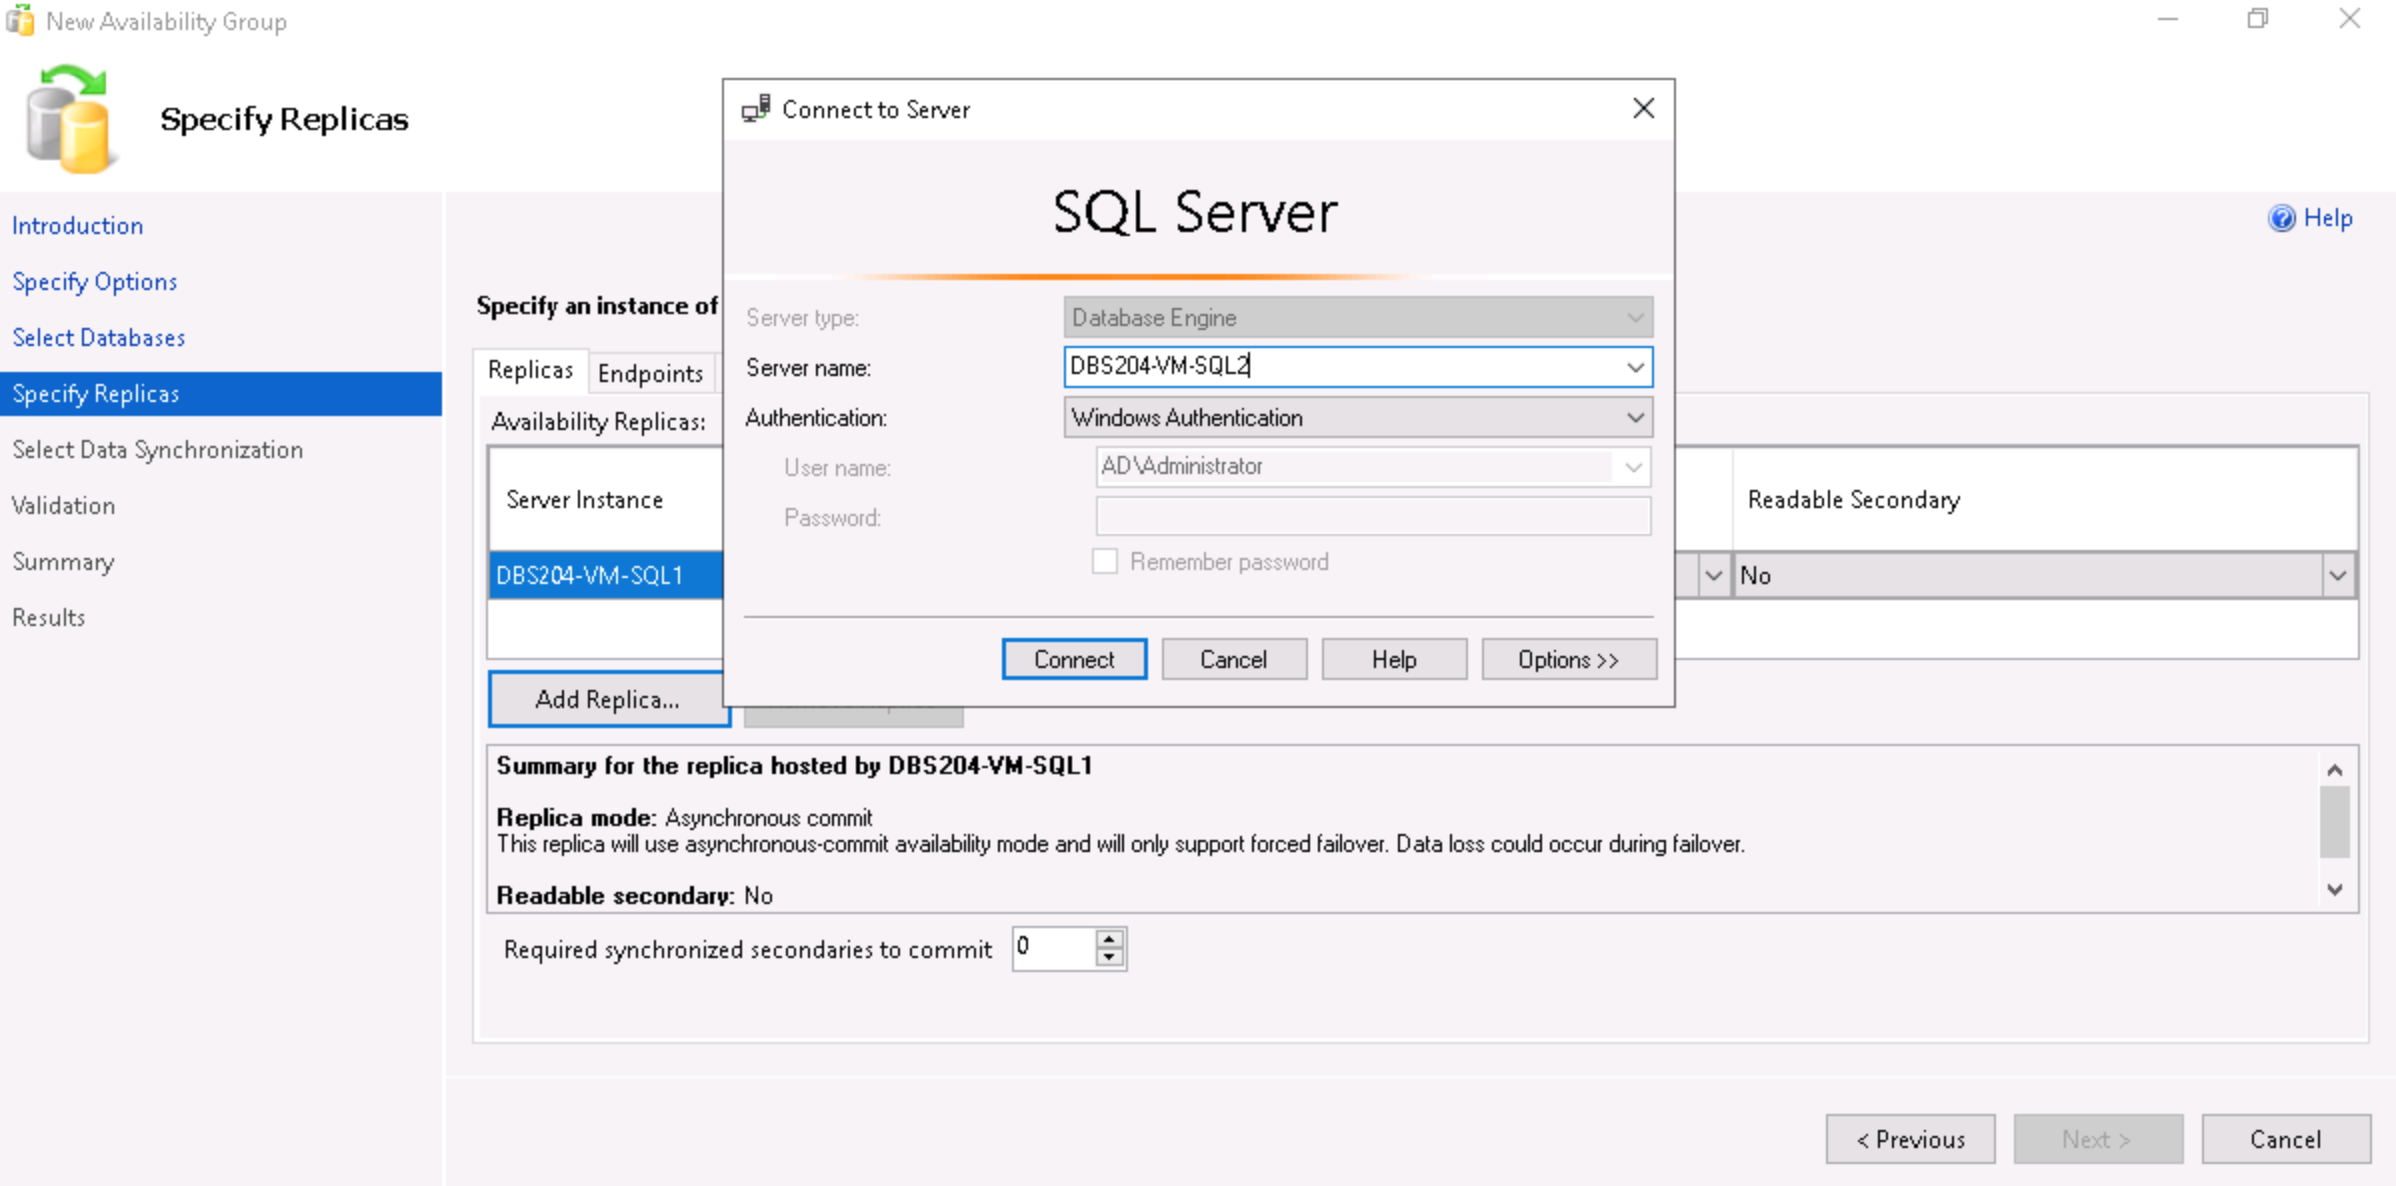
- Click on Add Replica and connect to the instance that needs to be added as a replica.
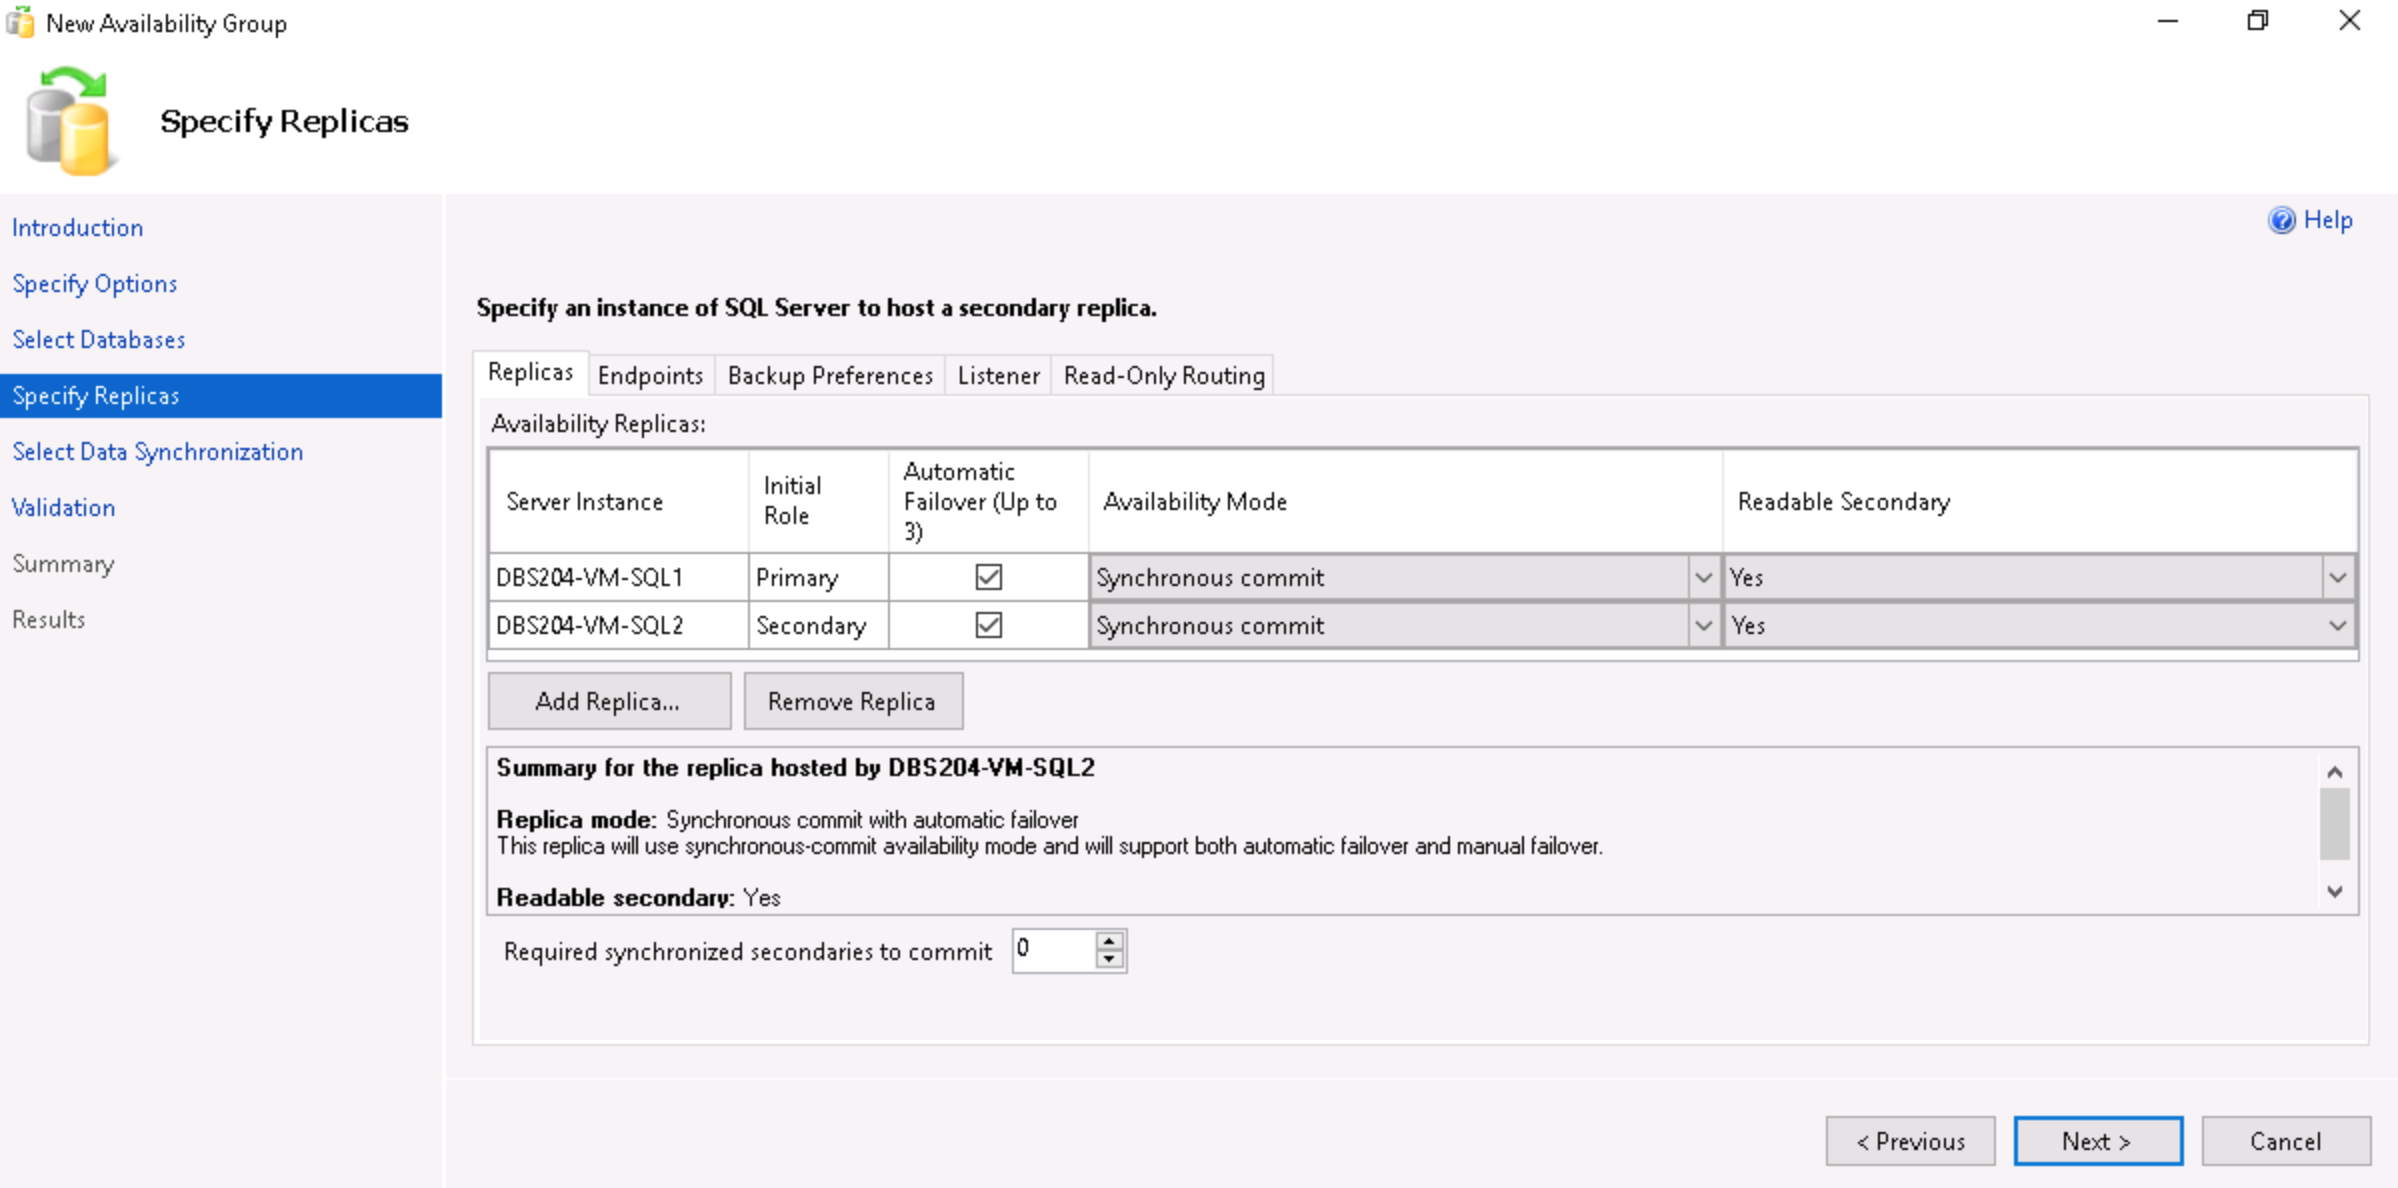
- Set the options for Automatic Failover, Availability Mode and Readable Secondary, and click on the Listener tab.
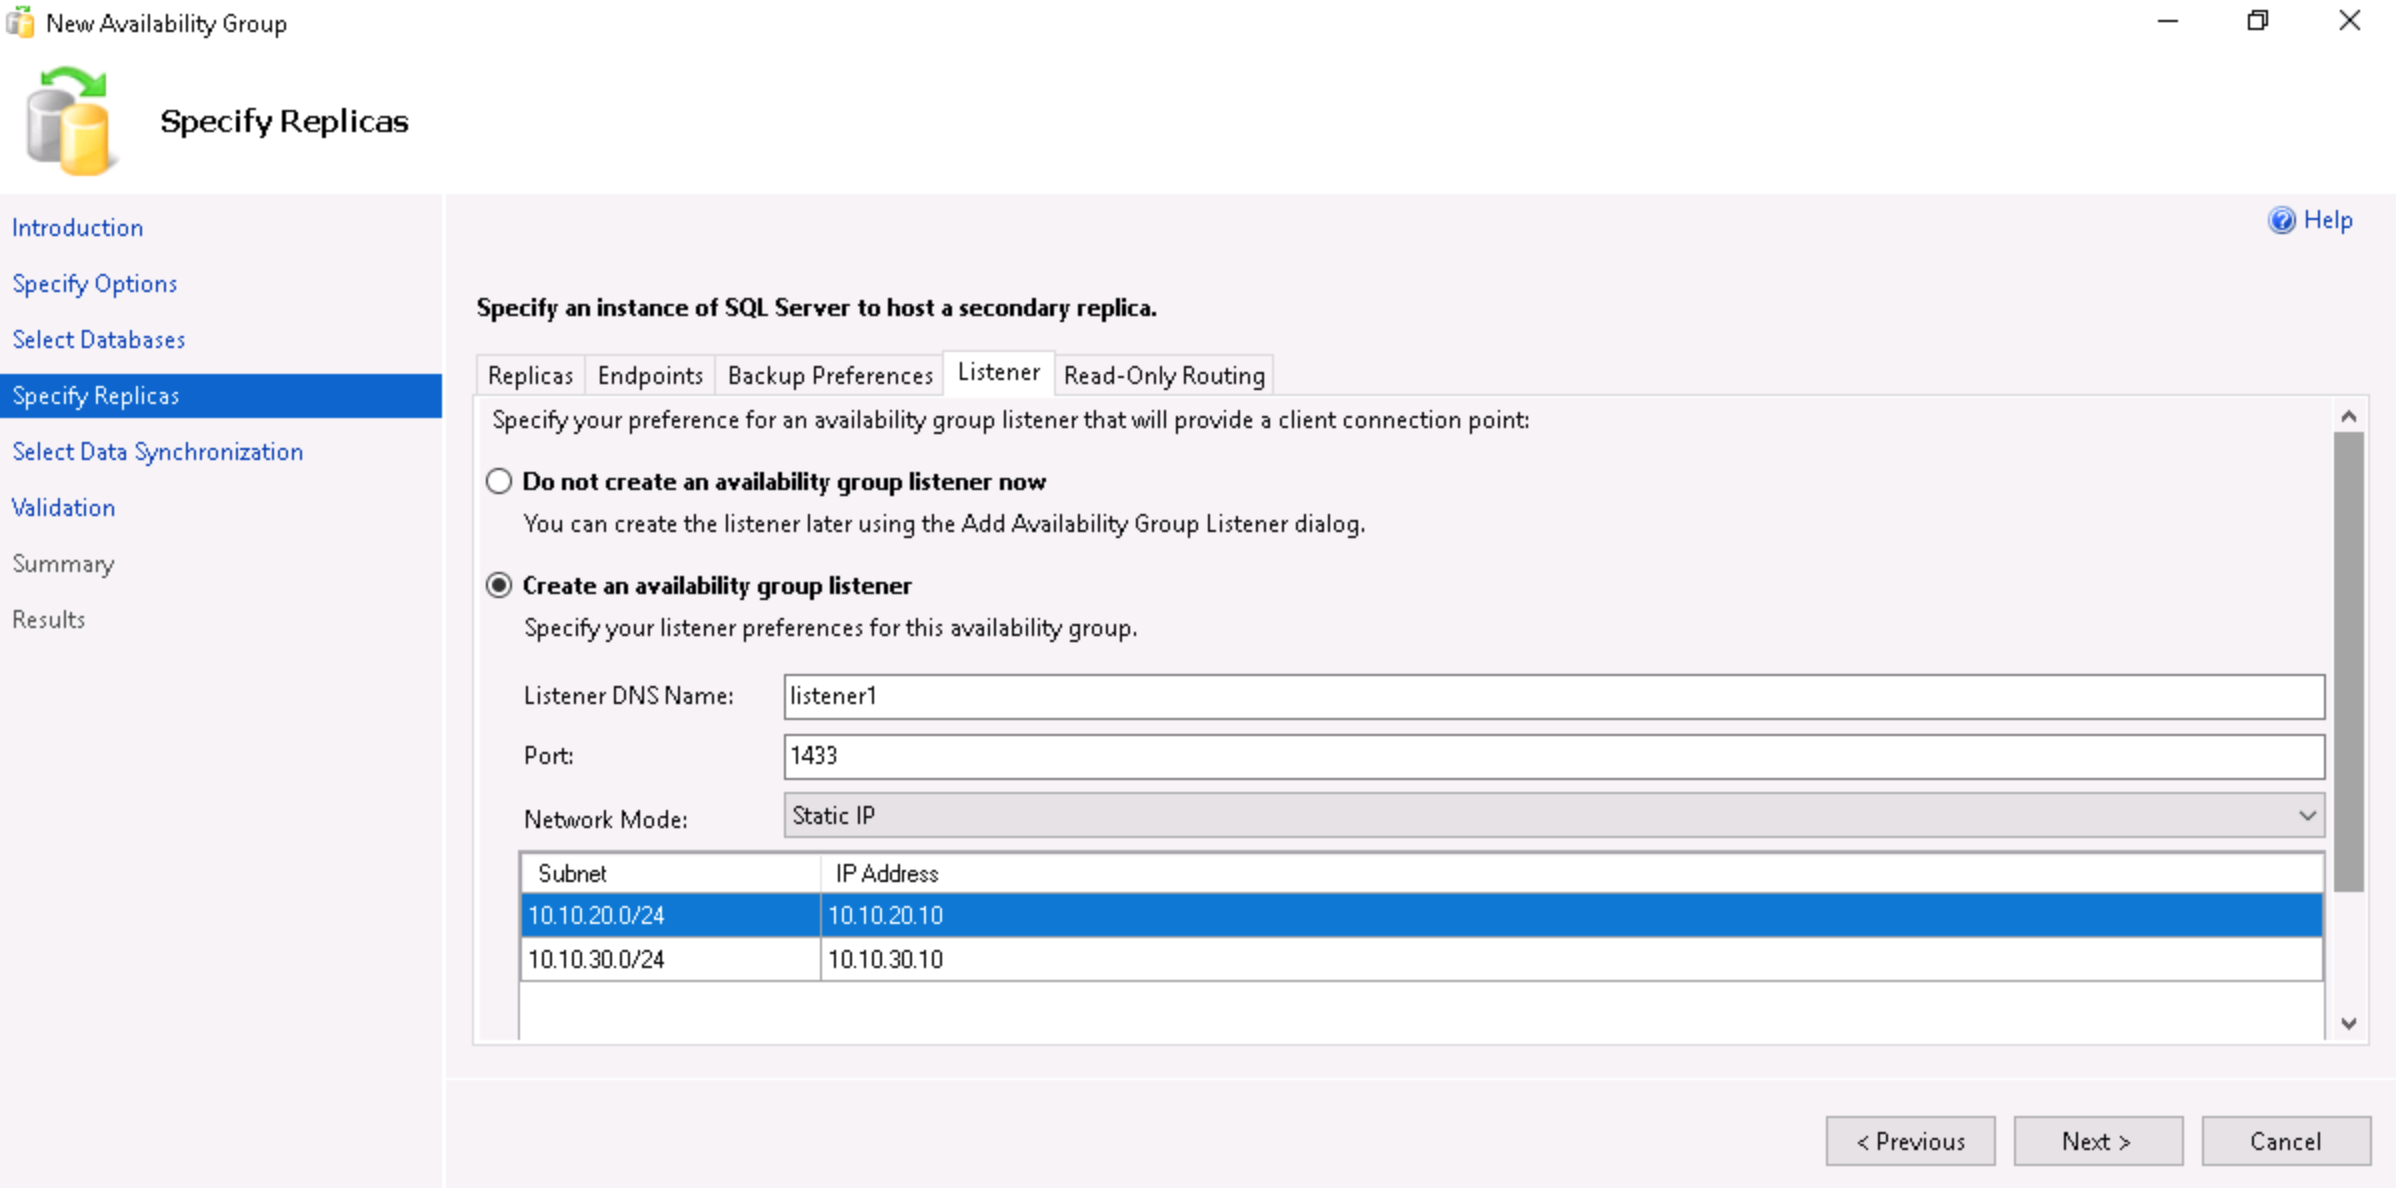
- Select the radio button Create an availability group listener and set the Network Mode to Static IP. Click on Add, select the first subnet, enter the static IP to use for the listener and click on OK.
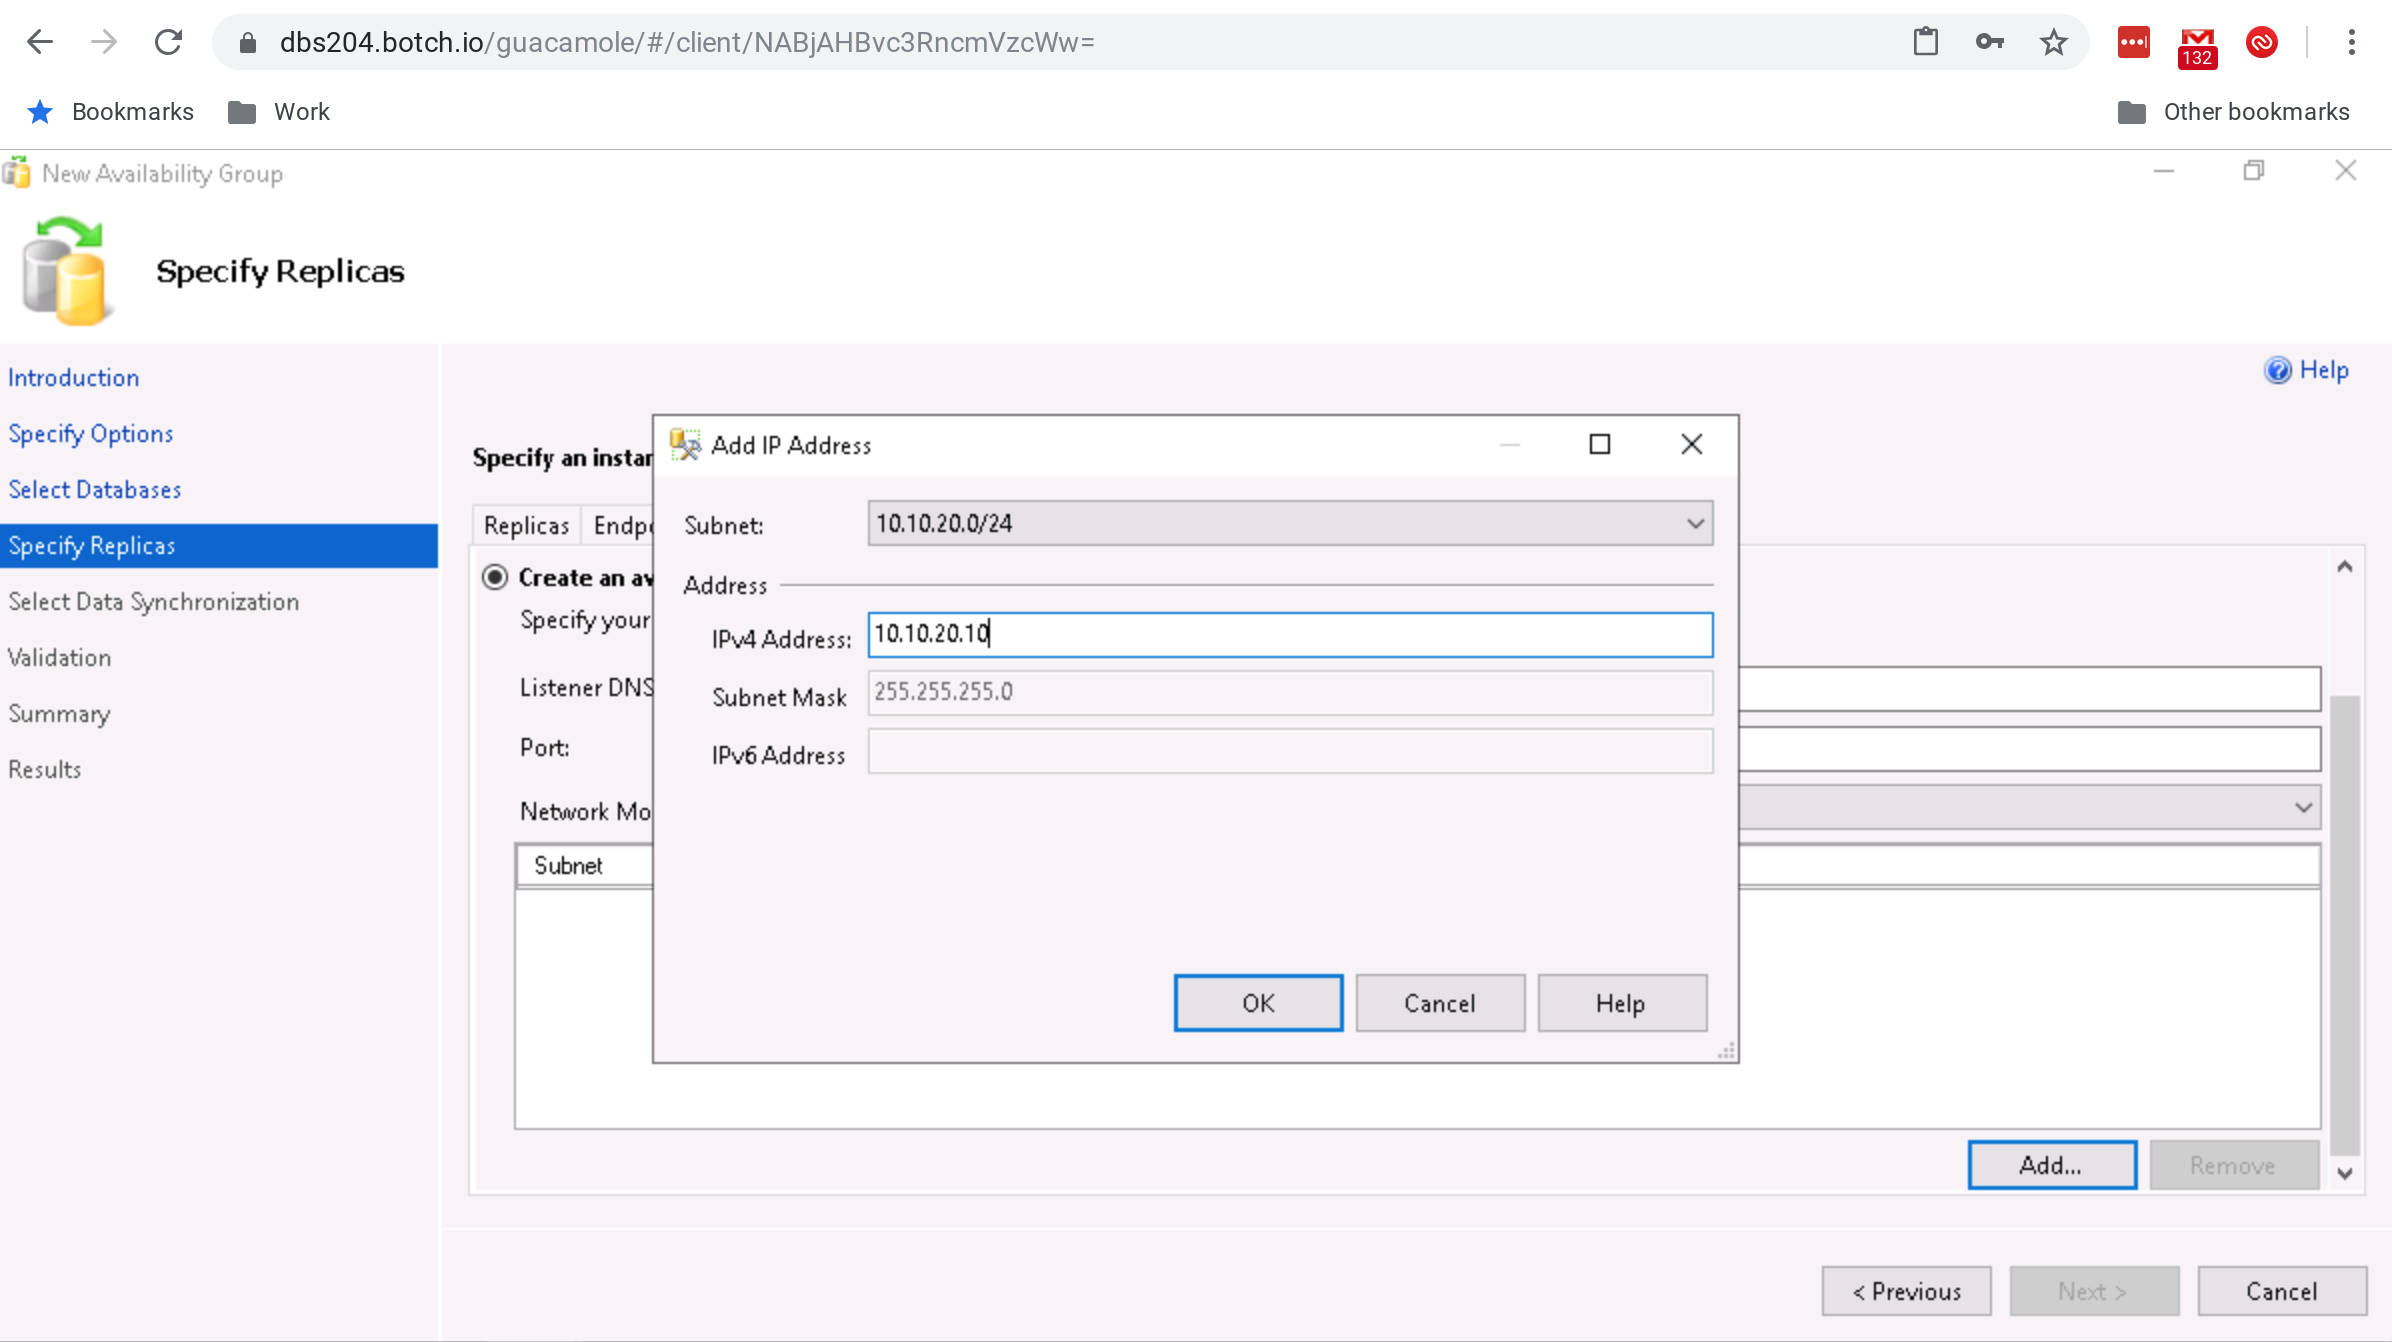
- Repeat the above step for the other subnets and click on the Read-Only Routing tab.
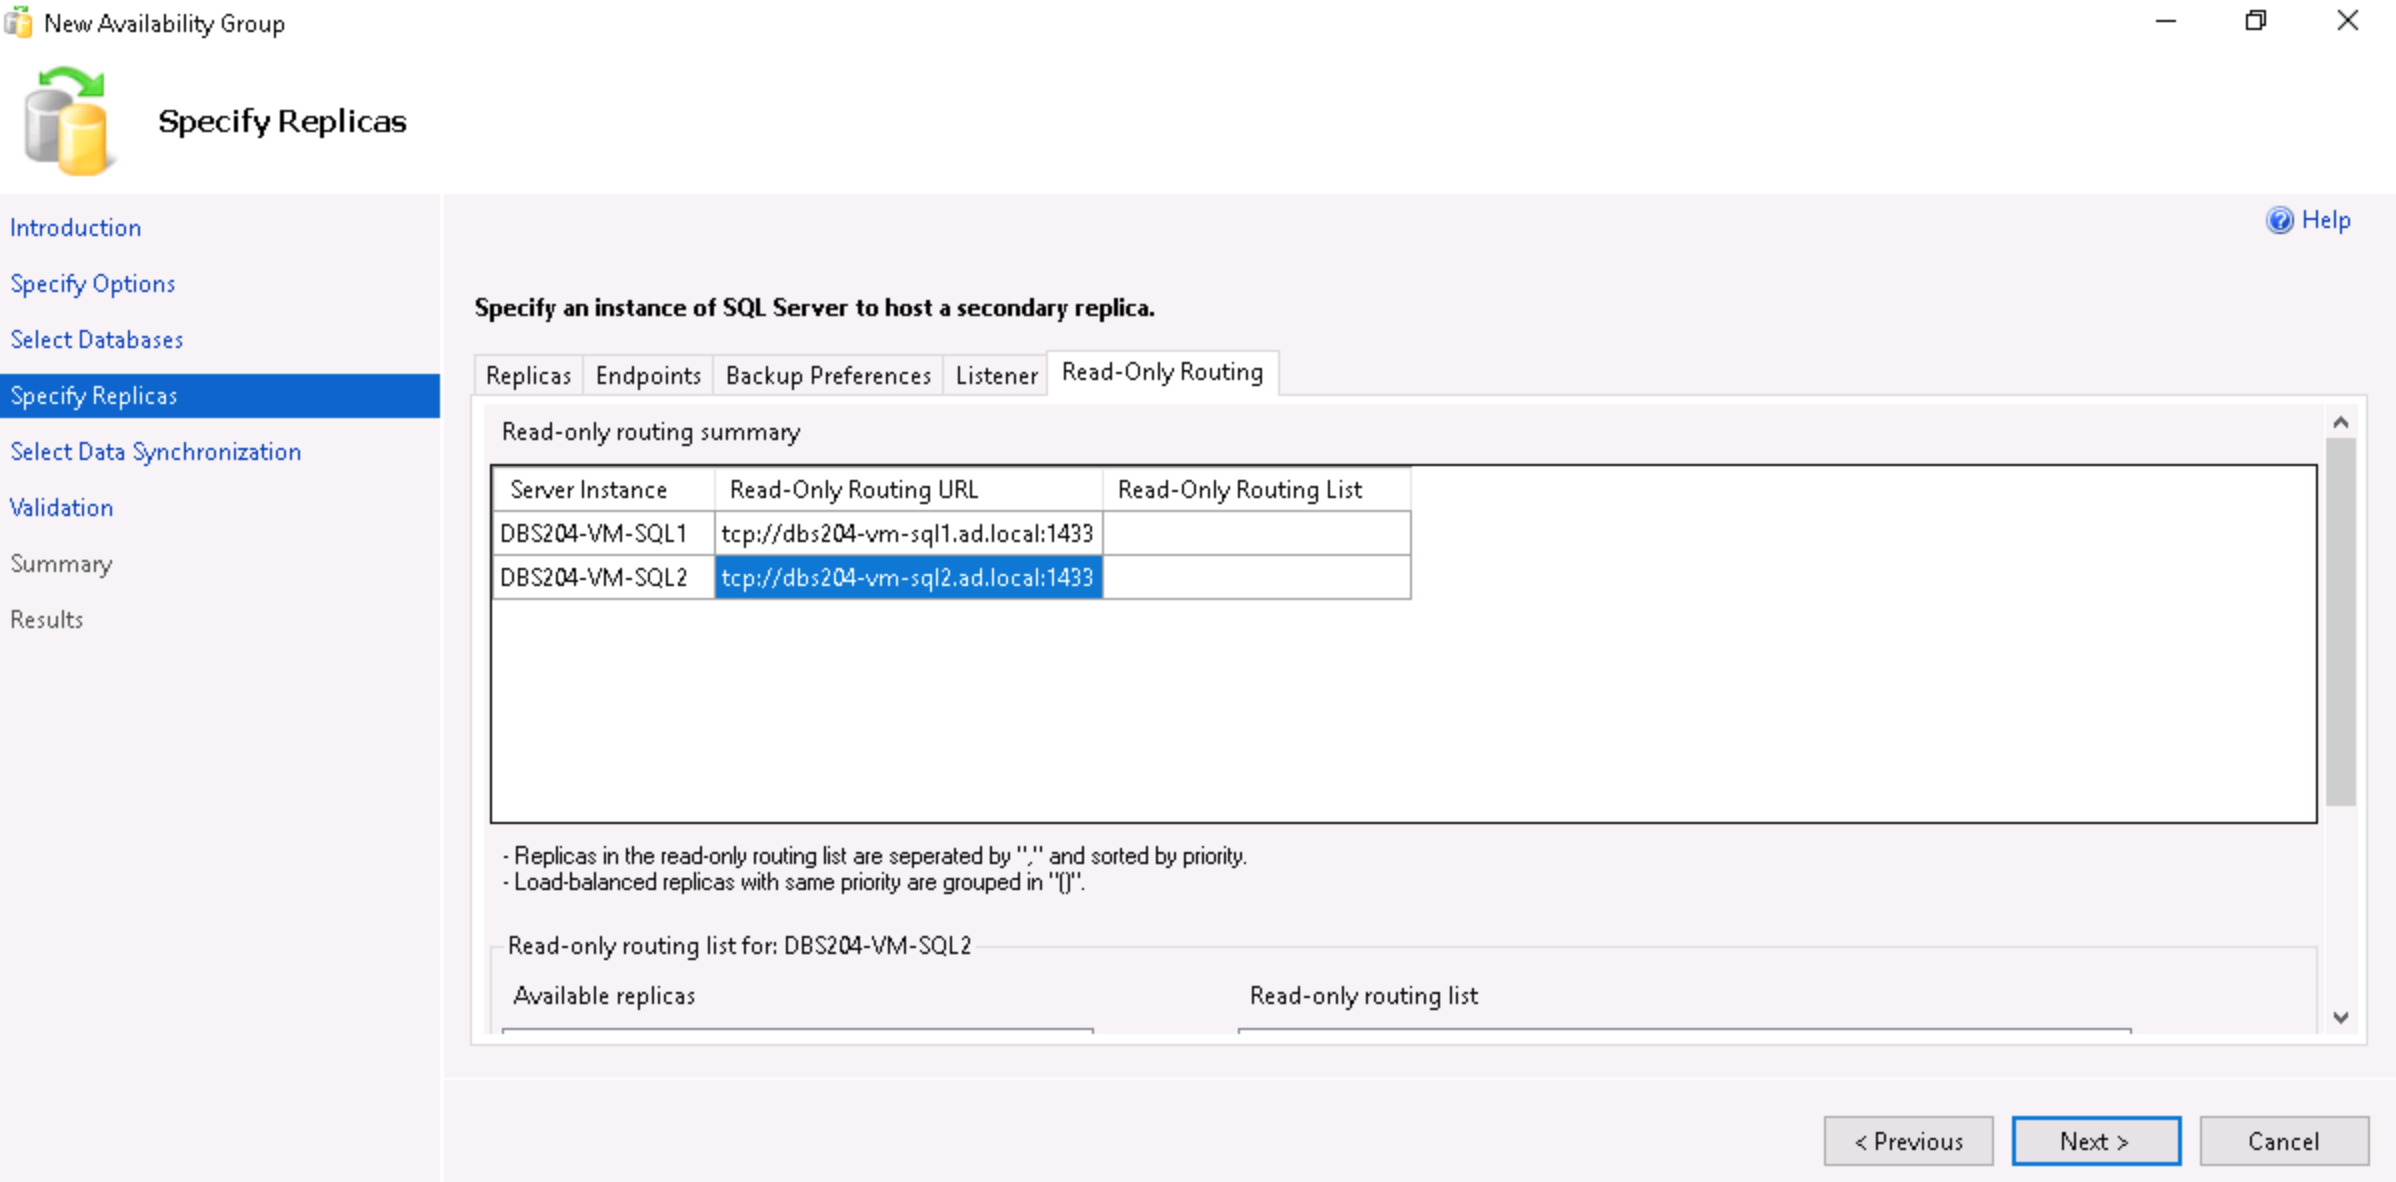
- Set the Read-Only Routing URL for each instance.
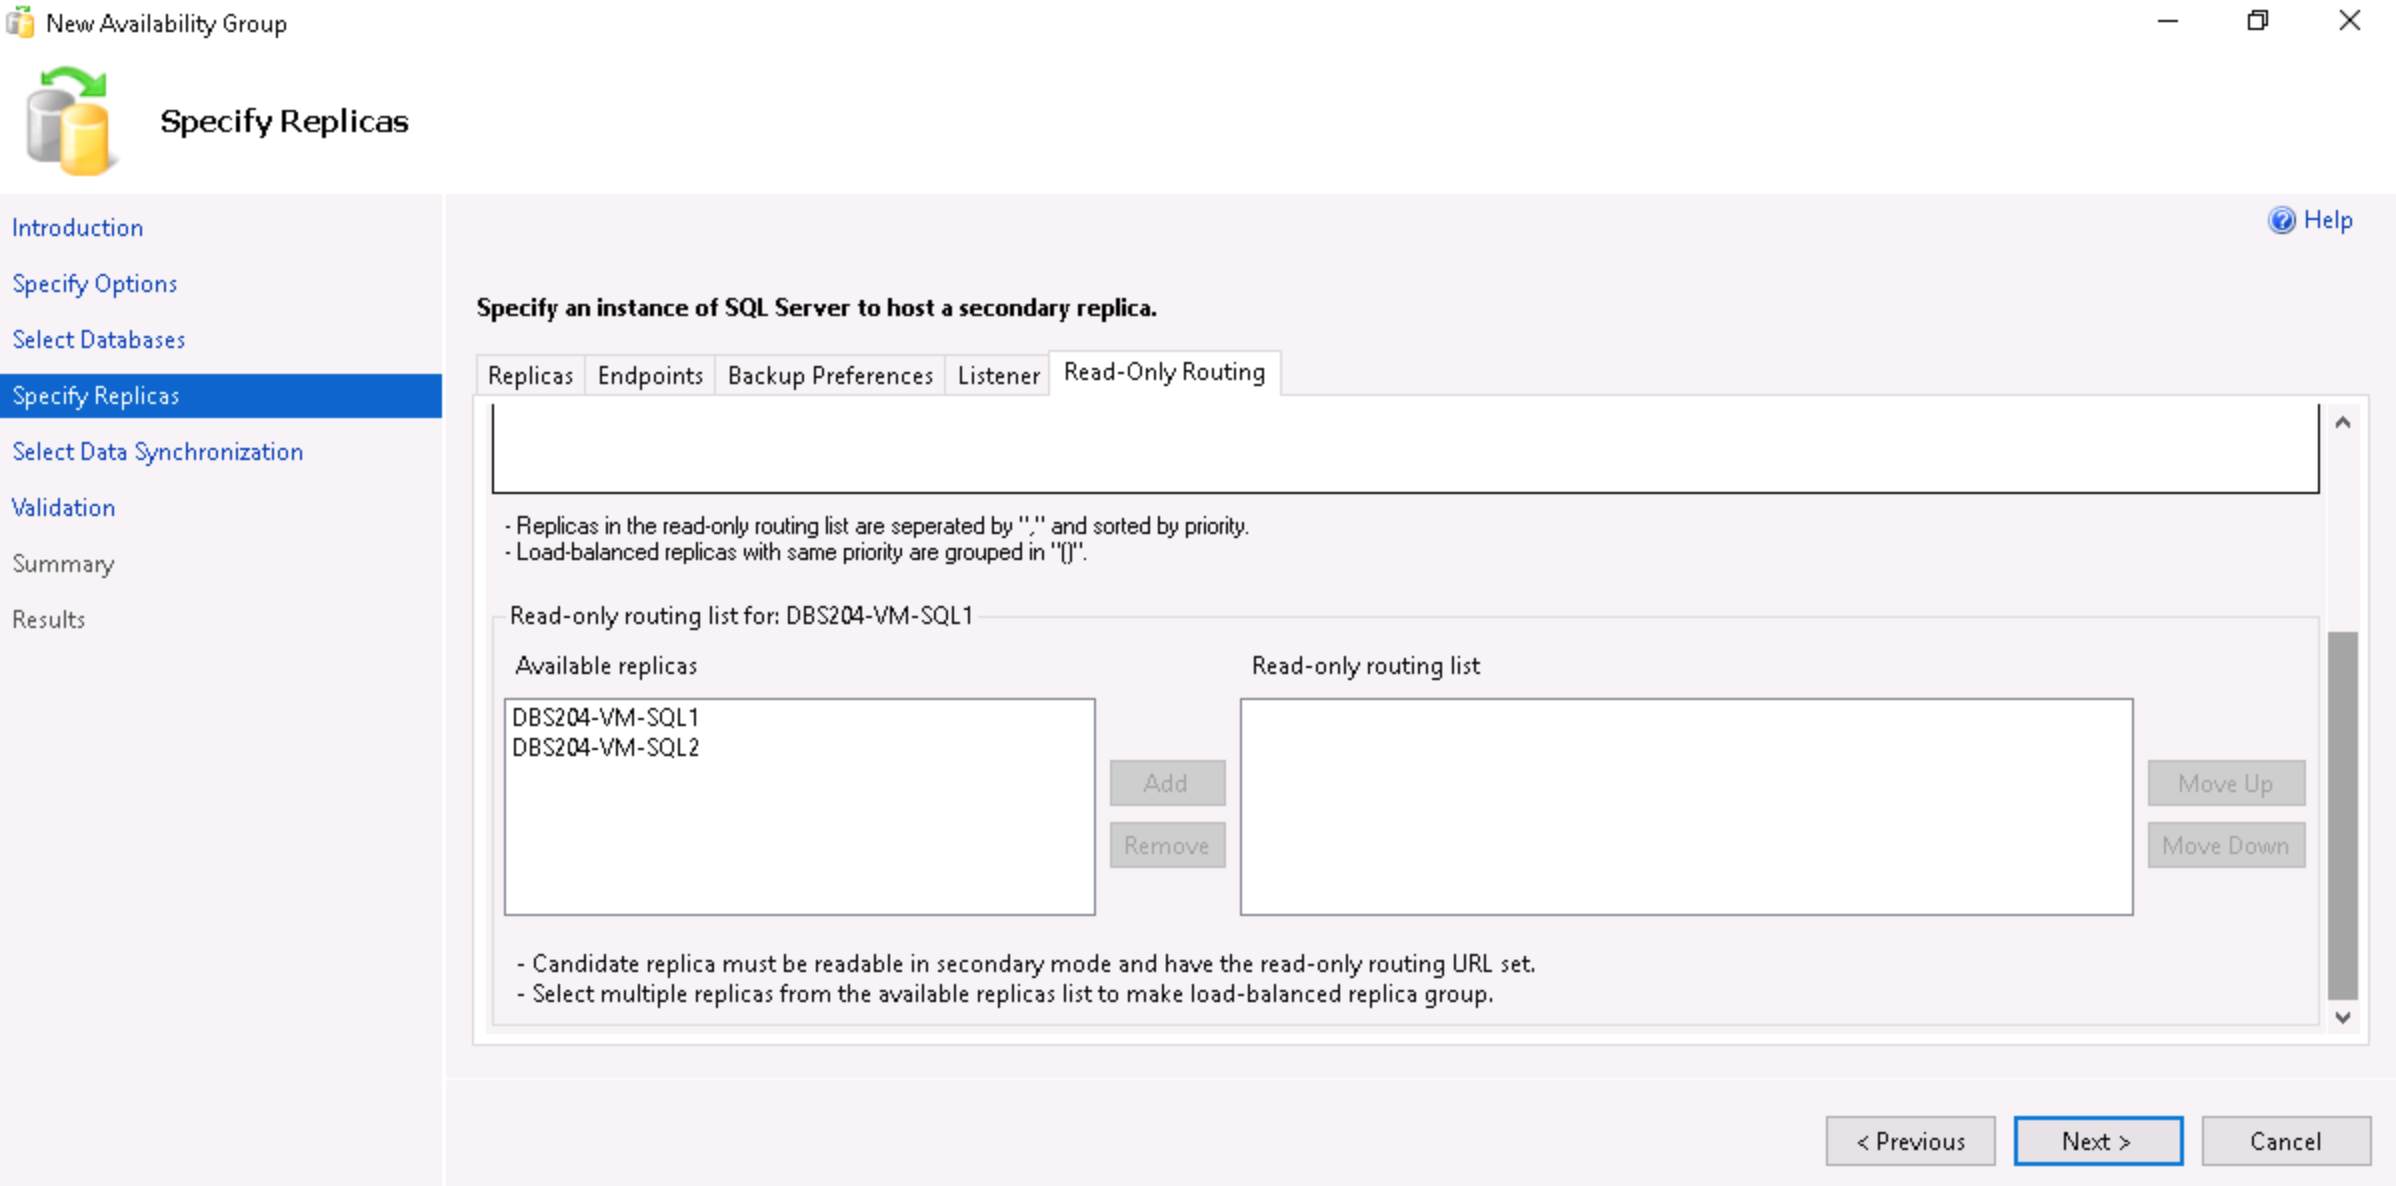
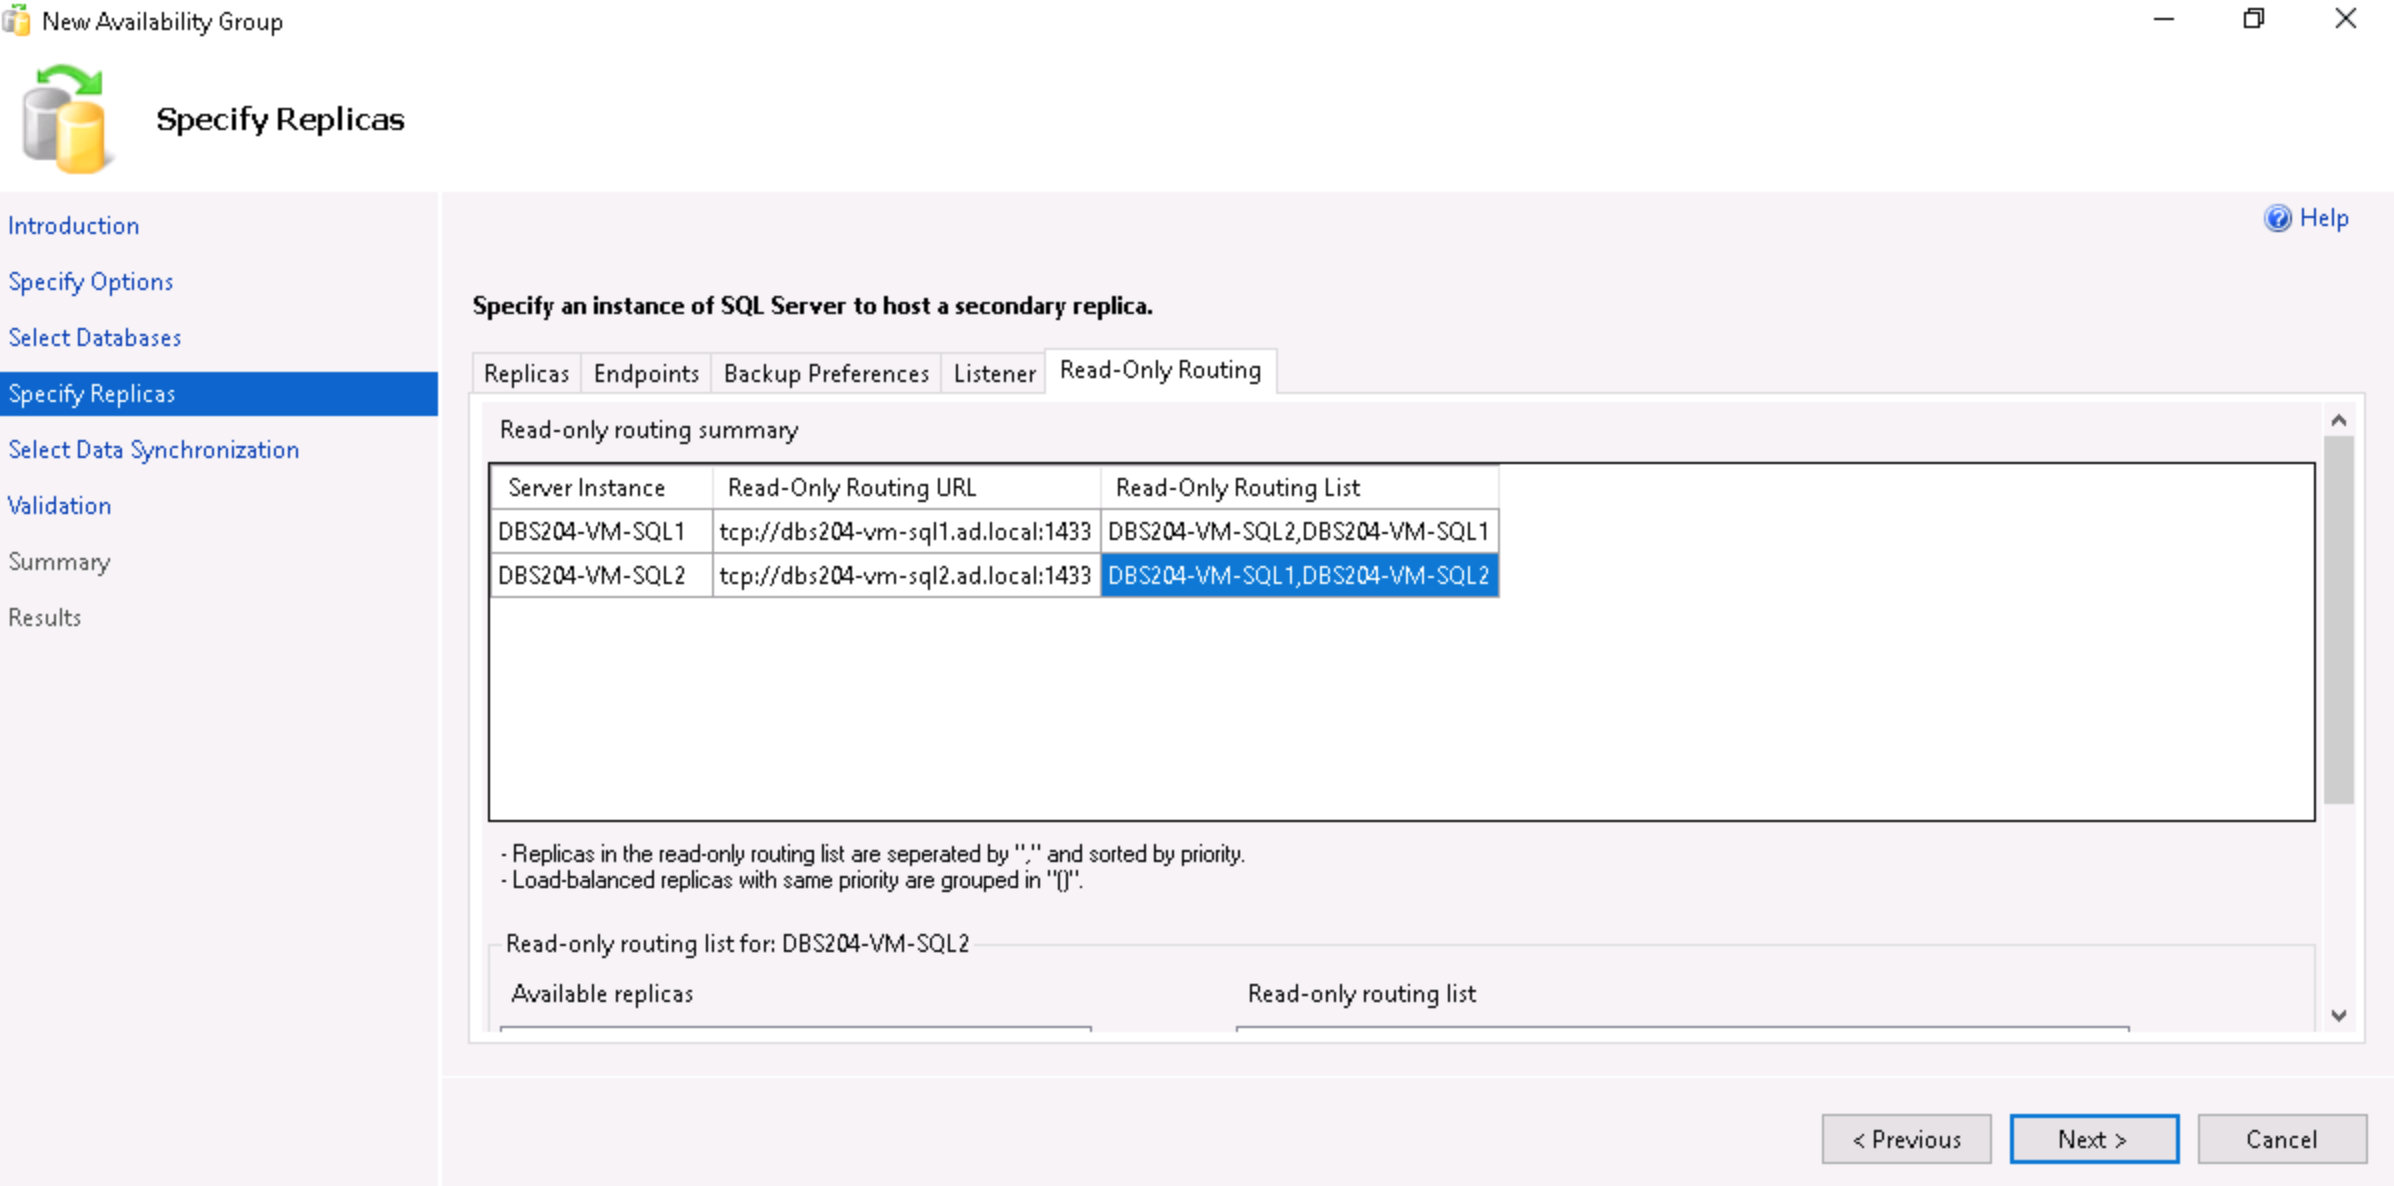
- For each instance, select the replicas to use for read-only routing and click on Add.
- Click on Next.
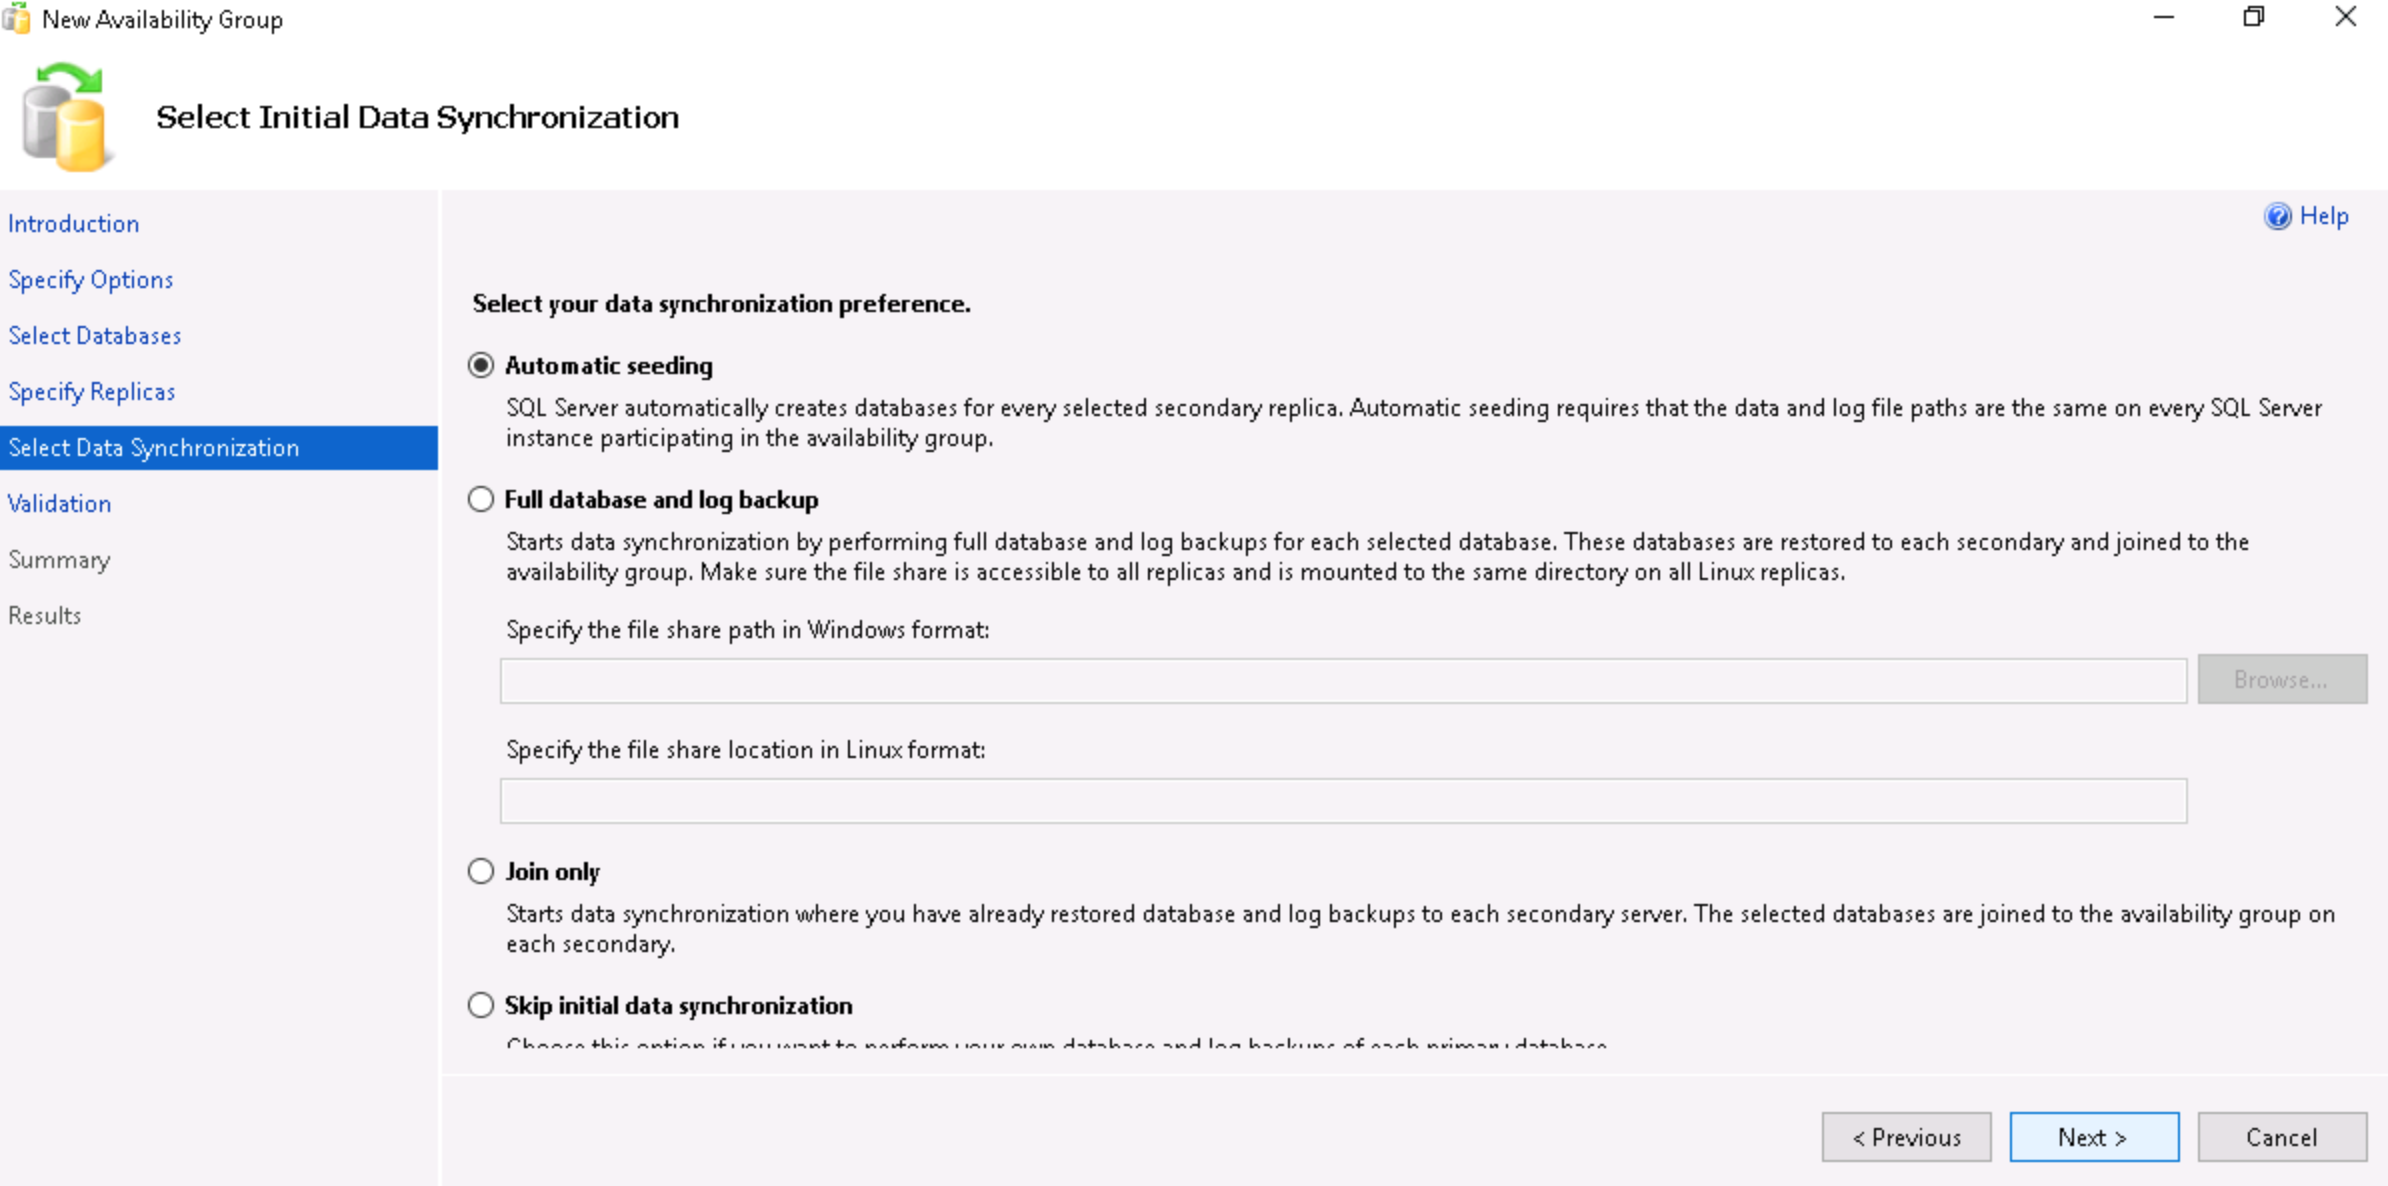
- Select Automatic seeding and click on Next. Step through the final stages of the wizard to complete the Availability Group creation.
